I just made top 8 in BCS Duluth, so I’m going to go over the deck I took (8 bar Bang Dream), as well as my experience in the BCSs I’ve played it in. This was the third BCS where I played this climax lineup; I made a couple small changes from tournament to tournament, but it’s largely been the same list. I went 5-2 in Pasadena and 4-3 in Vancouver, and then in Duluth, I went 5-2 in Swiss and 1-1 in top cut, so my overall BCS record with this deck is 15-8. (I played Tomori topend in two previous BCSs; that was still a similar deck, but different enough that I’m not counting it as the same deck.)
Table of Contents
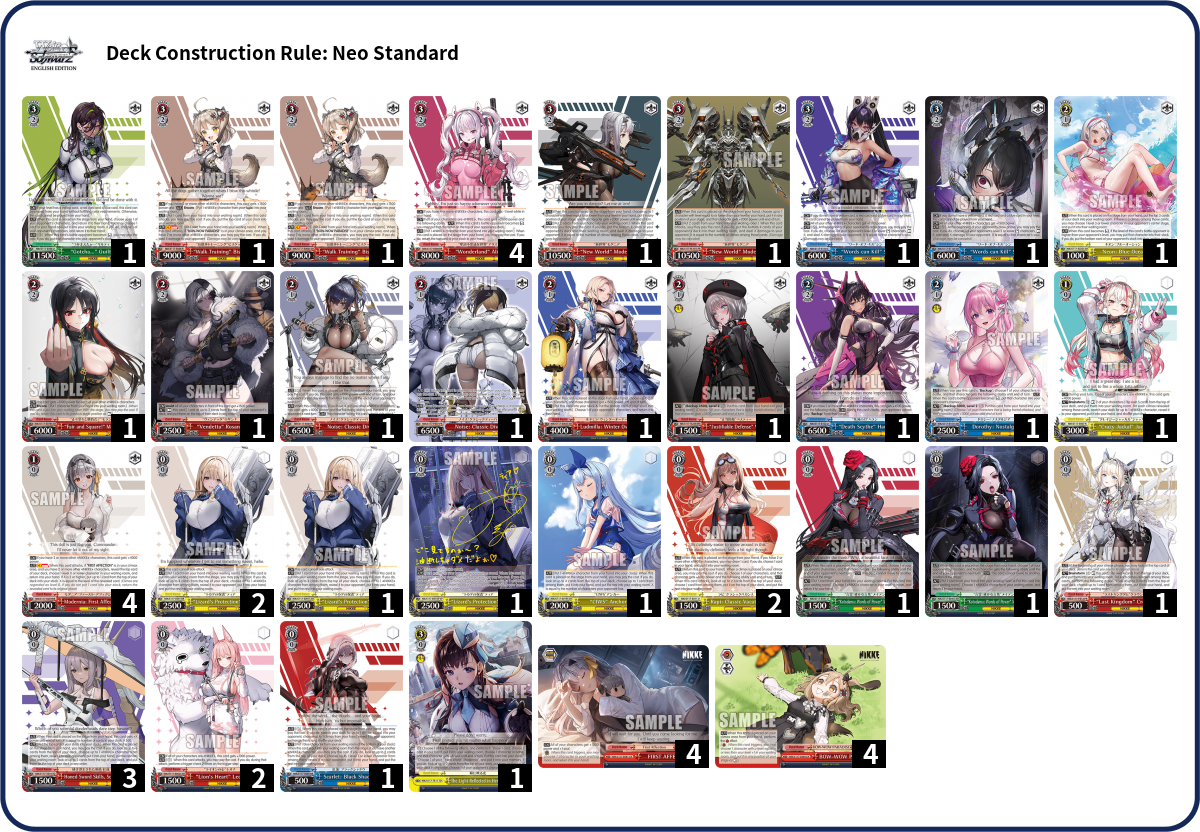
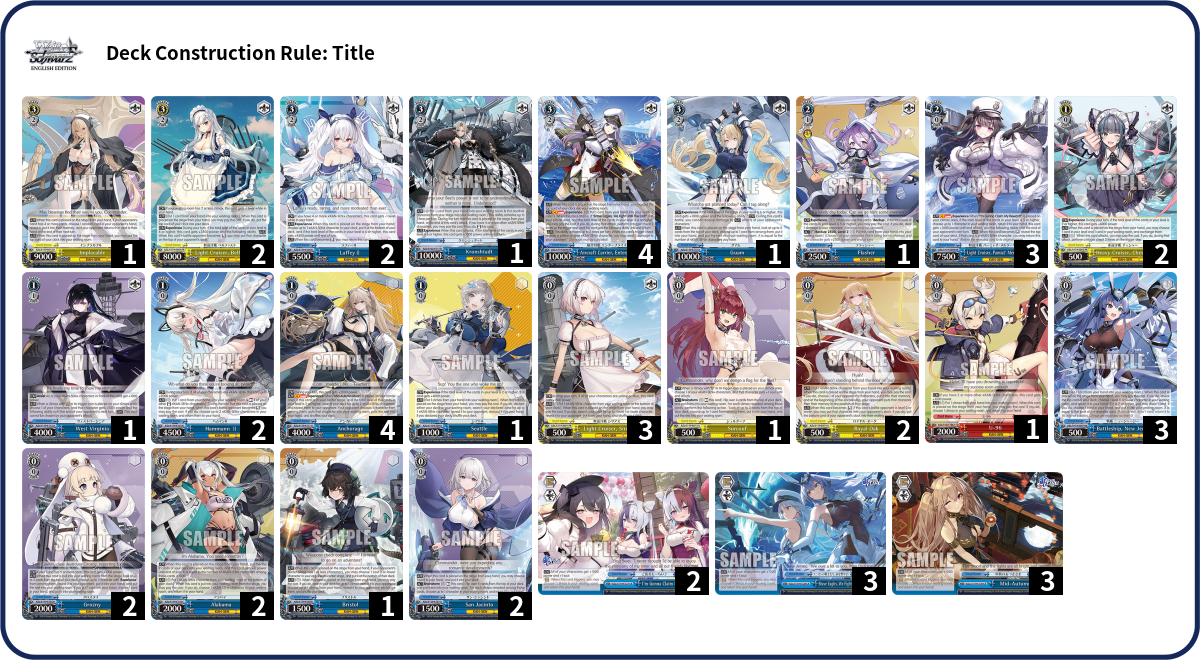
Deck List
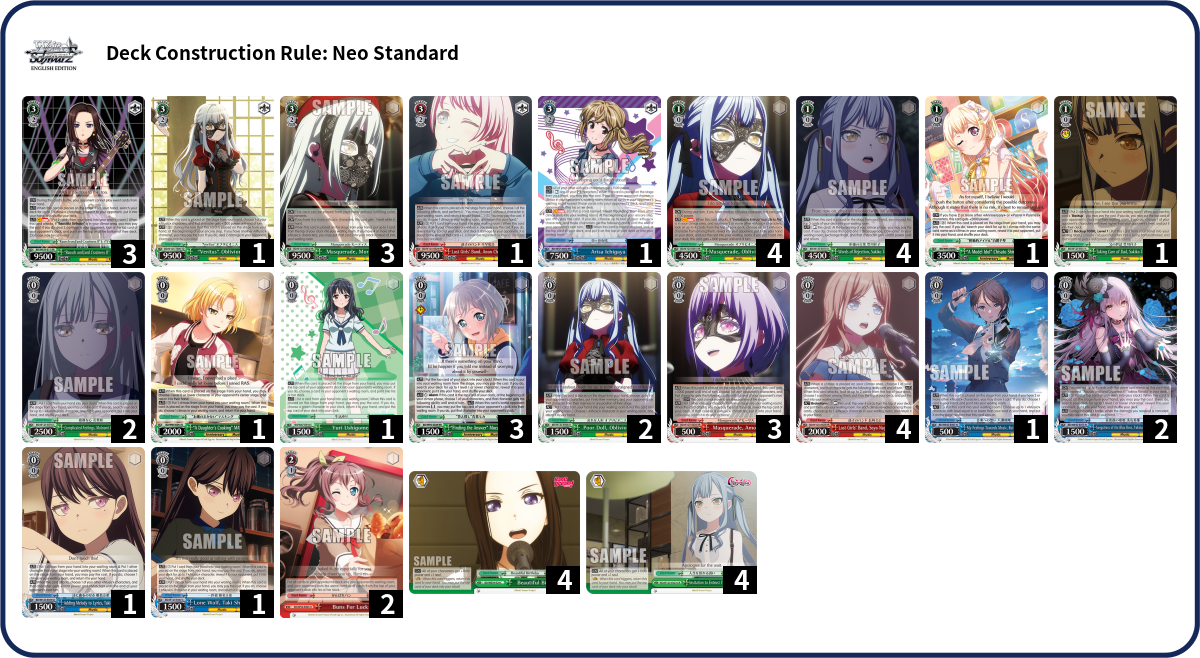
Deck Log: 237U3
EncoreDecks: vrQwEd8P3
Deck Origin & Overview
This deck grew out of the bar/pants build I initially built; I’ve made a number of changes since then, but the core of the deck has largely remained the same. The most notable change, of course, is the different topend, and that mostly came about as the result of a change I made after that post: I cut the stockswap and replaced it with the fumio.

The reason for that is that with a 3-color deck, ensuring you have something in level that works for the resonate condition of the Tomori finisher can actually be kind of awkward.
This is particularly true if you don’t have the pants, since in that case you can’t just use the combo to search out a resonate target from your deck. So cutting red entirely let me use the third card of the level to set up an easy resonate target: a 4-of like the level 1 combo or its changer, for example, or maybe a card that I already had in hand, guaranteeing the condition. And while that felt pretty nice, I was a bit uncomfortable not having stockswap, particularly given that I expected to face a lot of other Bang Dream decks.
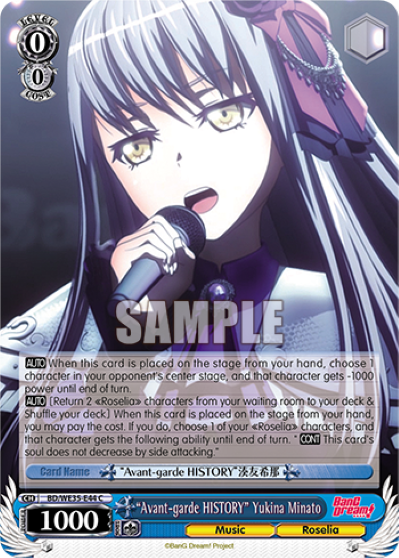
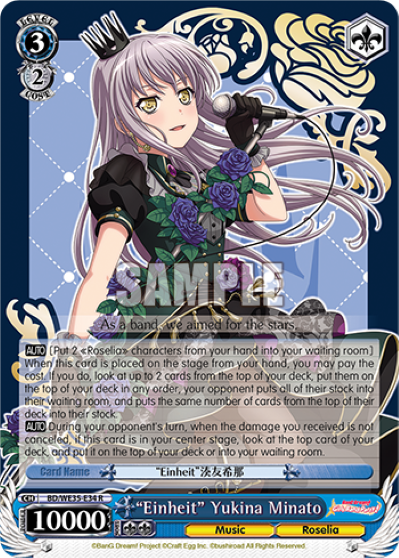
So the main thing that made me switch to the Layer topend was wanting a finisher that let me comfortably play stockswap. Ironically, I don’t think I played it once in the three regionals I’ve taken this deck to since making that switch; the few times I’ve wanted to play it, I didn’t have it. Honestly, part of me is looking forward to the banlist (if Bang Dream ends up getting hit the same way as it did in Japanese) so I have an excuse to cut those two bricks and free up a couple deck slots, but practically speaking, it’s still a very good card to have access to (and to be able to threaten, something that my Tomori deck didn’t do very effectively when I was levelling blue at level 2).
At this point, I’d also come to feel that the big strength of this deck was the early game and midgame, more so than the finisher. (This is not, I believe, an unusual take, though I might focus more on the Oblivionis level 1 combo over the Mortis EP healer compared to other people.) So rather than a flashy finisher that requires a lot of deck space and attention (looking at you Anon), I wanted one that was simple but competent, not requiring much in the way of deck slots and setup; and ideally, one that was either green or red. (And I didn’t really want to go for Doloris on account of its weakness to defensive counters, which have only gotten more prevalent since.) Layer fit the bill almost perfectly, with the additional bonus of letting you pretty much completely ignore Nikke’s tap counter (and possibly some other random event counters).
But when I sleeved up the Layer topend and started trying it out, I realized something that’s ended up being my favorite result of this change, more so than any of the reasons I actually made it in the first place: you don’t have to put the crusch ability from the brainstorm on your first attack.
When your climax lineup is not 8 bar, you have to worry about triggering a non-bar on the first attack, and so it’s good to give that character that extra bit of trigger control. With 8 bar, that’s much less of a concern. (Yeah, there’s still a chance that you trigger a bar on the first attack and then blindstock a bar; but in that case, the crusch ability wouldn’t have prevented you from triggering a climax anyway. And depending on the situation, you might not need to take the blind stock at all.)
What this means is that if you have one brainstorm, you can put the ability on the last attack, and if you have two, you can put both abilities on the last attack. Since you can almost always mill to refresh with the combo, this lets you mill down to only 3-5 cards before your last trigger, giving you a better chance of leaving a guaranteed cancel or two in a small deck, without the risk of triggering a climax and leaving a chunk of clean damage. Or if you want to find a climax for next turn, and you didn’t already trigger one on the previous attacks, you can dig for a climax to trigger on the last attack.
That said, stacking both crusch abilities on the last attack is mostly applicable when you don’t already have a climax in your hand; if you do, I think it’s still generally better to put them on different lanes, probably the first and last, to minimize the chance of triggering and ending up with a second climax.
In general, I tend to aim to keep the possibility of milling down to 1 card open at least into the second attack, and usually the third, meaning that I’ll often mill 4 on the first or second combos even if I’m pretty compressed. The nature of the combo is such that you can’t rely on keeping any compression you have in your current deck; there’s always the chance that the climaxes are on top and you’ll mill and/or trigger them. (To some extent this is the case any time you don’t have top-deck knowledge, since you can randomly triple trigger; but it’s even more true for a combo that mills.) But once you get to the last combo — or really, once you’ve found a target for the last combo — at that point, you can look at your compression and hope to keep it.
Say you have two crusch abilities stacked on the last attack, you’ve milled down to 5 cards in deck, and you know you have 2 climaxes left. If you check the first card and it’s clean, you can just trigger it and leave a 2 in 4 deck. Or if you check the first card and it’s a climax, but the next card is clean, you can trigger the non-climax and leave a 1 in 3 deck. (Alternatively, you could trigger the climax and decline the blind stock for the same deckstate.) But even if the two climaxes are the top two cards, you can either mill both of them, getting them both into refresh and leaving a deck of 2 clean cards, or trigger one of them to end at 1 card (and get a guaranteed clean blind stock). Basically, you get the chance of leaving cancels in your deck rather than milling them, without the risk of milling too little and giving your opponent a nice chunk of guaranteed damage to swing into. (If you want even less risk, you can mill down to 4 cards rather than 5, so you can mill down to 1 card if necessary without triggering a climax; that means there’s one more chance of milling off a climax before you get there, though.)
Similarly, if you only have one climax left, you can mill down to either 4 or 5 cards depending on whether or not you want to trigger that climax if you see it. (Come to think of it, I might have been milling a bit too much in that case; it’s been a while since I took the time to think through these scenarios.) If you want to trigger the climax, you can stop at 5 cards, and then either it’s in the top 3 and you trigger it (and end at 1 card), or you end at 1 in 2. If you don’t want to trigger the climax, you can stop at 4 cards, so you either end at 1 in 3 or mill to 1 card left.
Of course, these considerations can change based on the specific situation and matchup. Sometimes you don’t want to leave 1 card in deck, and so you instead want to leave open the possibility of reaching refresh. Sometimes you’re concerned about stockswap, and so don’t really want to leave a small compressed deck (though I often feel like leaving a deck with 1 climax is nice there: if they stockswap, you’re only guaranteed to have lost 1 climax, so there’s a decent chance you’re still in a reasonable position, and if they don’t, you get that guaranteed cancel). And if you’re close to levelling up, you might want to guarantee clock compression: for example, if you’re 1-5 and end up with 1 climax in 3 cards, maybe you’d still like to mill one more card, just in case the climax is on the bottom and you take a 2 (though it also might be worth taking that risk, rather than the risk of losing the guaranteed cancel; to some extent, it depends on how big you expect the first swing to be).
This all relies on knowing how many climaxes you have left in your deck; unfortunately, you might end up with blind stock, in which case you don’t have that knowledge. It can sometimes be nice to opt not to take the blind stock, but you can’t always afford that. The rule of thumb I’ve come up with is to assume that the blind stock is a climax, but to leave one more card in deck than you usually would: for example, leaving 2 cards in deck rather than 1 if there are no other climaxes (including the blind stock, this is 1 in 3), or leaving 4 cards rather than 3 if there’s 1 other climax left (so really 2 in 5).
Beyond what it means for the crusch abilities, there are also a few more benefits to the finisher being on bar.
For one thing, if you trigger it, that guarantees you a climax for next turn, while still letting you potentially refresh 7 climaxes; with pants, I often ended up feeling like I didn’t want to take a climax and further decompress myself. Door can let you salvage a character that searches or digs for a climax, but that’s either more expensive or less reliable — though of course, bar does require a climax swap if you’re looking to loop the level 1 combo, so it’s not necessarily much better. Of course, if you’re looking to go for the finish next turn, it’s perfect; and I do feel like there have been more times when I’ve just naturally had the finisher climax in hand.
And if you don’t want a(nother) climax in your hand, and the game is going well, you can take advantage of the hand limit to ditch bars that you trigger, meaning you can get a triggered climax into refresh on the turn that you triggered it.
Of course, there are also downsides to this finisher and this climax lineup. The finisher isn’t as cheap as some of the others, and you can end up losing stock by avoiding blind stocks (or alternatively, burying climaxes without realizing it). The finisher also doesn’t have as high a ceiling, particularly when you need to kill from a long range; since it only adds burn 2s, you can’t afford as many cancels as something with larger instances can, and there’s no chance of a single finisher giving you multiple additional instances of damage (though it is possible for a single finisher to go through two climaxes, if you can put one on the bottom of the deck and the opponent isn’t too close to refresh). It’s often more difficult to ditch climaxes from your hand than to pay them out from stock, and in general, triggering the finisher climax is less useful in bad games where you already have a bunch of climaxes in hand, or aren’t able to find a climax swap, for example. This deck also has an extremely low number of soul triggers, even lower than Doloris builds. Naturally, I think that the benefits of this finisher outweigh the drawbacks — I’m here writing a deck tech on it, after all — but in the grand scheme of things, I suspect the differences are fairly slim.
Individual Card Notes
Level 3
Finisher:

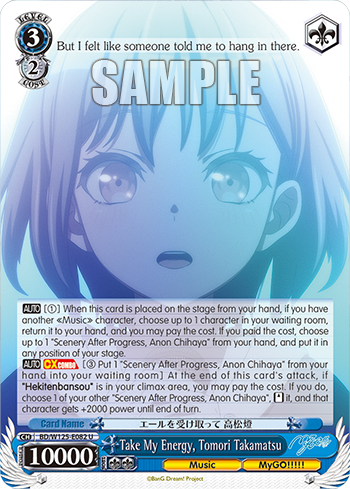
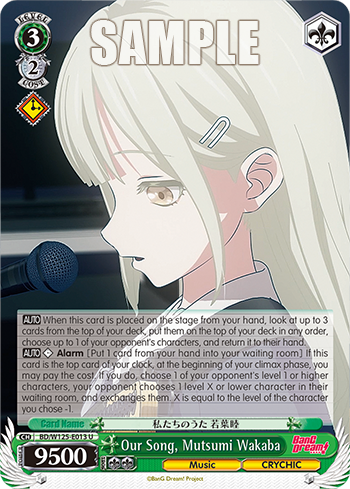
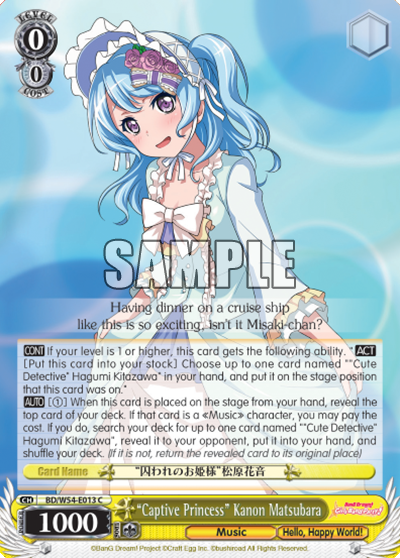
I went over my reasons for running this finisher above, but I haven’t talked that much about the finisher itself. The combo is pretty straightforward: ditch 2 on attack for a burn 2 and a pseudo-moca 1. I tend to think of this as just a burn 2, but occasionally it’ll remove an extra climax (though since it sends it to the bottom of the deck, that only really works if you’re not going to refresh the opponent on your finishing turn, or already did). Since the combo also searches on play, this is effectively just a ditch 1, but only if you’re not using that search for something else (unless that something else also saves you a hand). That search is one of the biggest draws of the finisher, often letting you get away with minimal sculpting before your finishing turn, though you do have to pay attention to what’s in your deck and what isn’t. (I tend to at least look at what soul triggers are going into refresh, since those are cards that may well be part of the finishing turn; beyond that, I also like to look for climax swappers and the Rui.) At 9.5k base, this is smaller than most finishers; that can sometimes make it more difficult if you don’t manage to kill, but ultimately it’s a pretty minor thing.
This is only a 3-of because there’s often not much reason to trifield it; double plus an off-finisher is cheaper, for almost the same result. It’s still nice to have the option to trifield, though, if you want to prevent event counters in all 3 lanes. Having less need to sculpt the finisher ahead of time also makes it easier to run fewer of them, though at the same time, it could be nice to maximize the chance of one being in deck on the finishing turn. I’d probably add another off-finisher before a 4th copy of the finisher combo, though (in fact, that’s what I had in Vancouver).
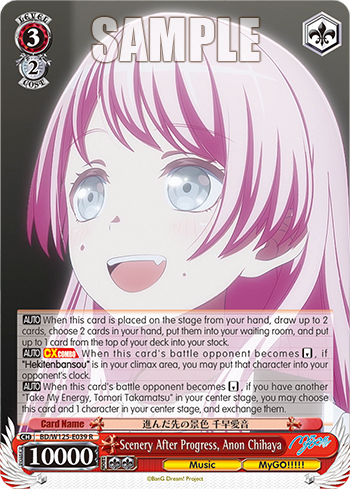
Anon:
I initially wasn’t big on this card, but I’ve since come around on it. (I think I was thinking of it as being 3 stock for a climax, but it’s really only 1 if it replaces a combo.) And it goes very well with the Layer topend: since that doesn’t spend any stock during the attack phase, the 2 stock that Anon spends is effectively free if you attack with her last, which you probably want to do anyway, because of the potential to control the size of the burn using the crusch ability from the brainstorm (and so attacking last means you have the most information about how much damage you need to deal). This means that Anon effectively just saves you a hand compared to a copy of the combo. Of course, while you potentially have the ability to choose how much you burn, there’s also a distinct possibility that you see nothing but 0s and so it’s just a burn 1. Though if you don’t need to sculpt anything specific from your deck, the combo can just pull 0s out, to make that less likely.
I like to aim to have the Anon and a copy of the combo in hand going into the finishing turn, to have at least two sources of guaranteed selection. The Anon can of course guarantee the climax (if you can get it into the waiting room, which generally isn’t difficult but can occasionally come up); but with the finisher being on a bar, I feel like I often don’t need to do that, which not only saves a stock but also frees up the Anon to provide waiting room access, complementing the deck access from the combo. In particular, if you’re low on stock, Anon can often effectively only cost 1 stock by grabbing the Rui.
A 1-of since it’s not needed until the finishing turn, and generally isn’t essential there. Most of the time you can find it either over the course of the game or on the finishing turn itself; and even if you can’t, you can often get by without it.
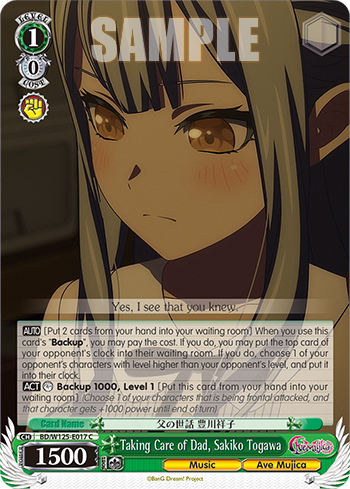
Encore-step burner:

The other off-finisher, alongside the Anon above. Similarly, this can use the stock you generate during the attack phase, and as such can save you a hand compared to a copy of the combo. (Though note that if you want to play both Anon and Oblivionis, you do need an extra stock up front, since they’ll spend 4 stock total.) Unlike Anon, this is a guaranteed burn 2; since it works from the back row, it can also be used to get an extra burn in the games where you’ve got lots of resources and need extra finishing power (or, more likely, in games where you’ve got lots of resources and just want to minimize the chance that the opponent god cancels their way to an unlikely victory, since having lots of resources tends to correlate with already being ahead). It also lets you attack with a 1-soul character if you want (though since it can be denied by memory kick, sometimes you need to keep it in the back even when you’d prefer that extra 2-soul attacker).
Once again like the Anon, this is a 1-of since you don’t need it until the finishing turn, and even then not all the time. Really, this could just be a second Anon without changing much. (It does have the advantage of being accessible off of both the ruijerd and the Yuri, being a green «Ave Mujica» character, but I don’t think I’ve had either of those come up.) I do like the slight additional flexibility from having both, though, and I don’t feel like I’ve struggled to find Anon.
Early play:
The early play healer that’s basically just one stock for no reason. I don’t really aim to spam this card, though; I tend to aim to loop the level 1 combo through level 2, and so I’ll generally only play one a turn at most (though there are certainly times when I’ve played two). While it’s cheap, it does still cost some resources, particularly if you end up playing over something (or if it means you don’t play a combo you could have); and so I’ll tend not to play it when I’m low on resources, or too early at level 2. It’s most effective, I think, when you’re expecting to hit the opponent to level 3 and want to try to get out of range of their finisher. On the other hand, if you’re behind in damage, it can potentially be better to aim to build up resources, and play towards compression to try to reduce the damage gap; still, throwing down an EP could be nice if the opponent is still at level 1 and might not be able to take out a 9.5k. On that note, this can also help you take out characters that are a bit too big for the level 1 combo to answer (though it’s still fairly small for an EP, so it’s not doing much against anything that’s seriously aiming to win board).
One thing to note is that putting the card you heal to stock isn’t mandatory; if you want, you can heal to waiting room instead. This can be nice if you’ve got a climax on the top of your clock and you already used your brainstorms (or just don’t want to mill). Relatedly, if you’ve got an extra climax in hand, you can potentially clock it and then heal it off; of course, in that case you can likely heal the climax to stock and then pay it out with a brainstorm.
This is a 3-of to have a decent chance of being able to field double if necessary; that also means that it doesn’t feel too bad to level one of them for green at level 1. There are a number of decks that run this at 4, and I think that’s a perfectly reasonable thing to do; it’s just not my playstyle, I suppose (as is probably already clear).
Fumio:
One of the decompression tools in the deck, and the one that can be easily sculpted on the finishing turn. The Yuri can let you exclude 2 climaxes rather than 1 sometimes, which makes it significantly scarier (though of course that requires an extra sculpt and an extra hand). In general, decompression tools often don’t come up, but can be extremely impactful when they do. I never used this in Duluth, but I did use it in the previous tournaments.
This is the only card in the deck that needs blue. So I’ll aim to level blue at level 3 (or at level 2 if red isn’t available), but I’m not particularly concerned if it’s not available (and I generally won’t level the Rui or the blue climax swap). Notably, the Rui can summon this without needing color, so even if you don’t have blue, you can still fumio if necessary. As a tech card, it’s a 1-of.
Level 2
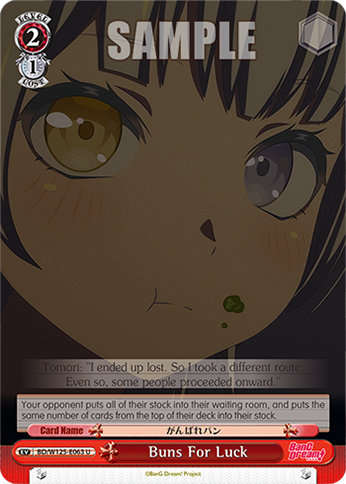
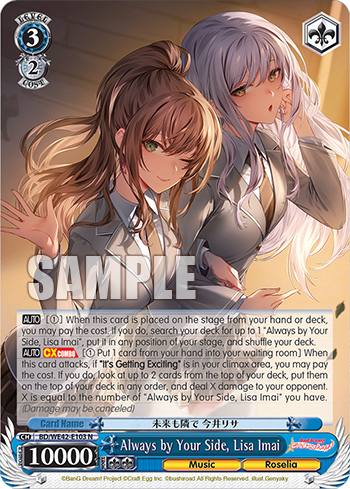
Buns (stockswap):
One of the reasons I’m playing this version of the deck to begin with. It has the potential to effectively win you the game on its own, and of course even the threat of it can make the opponent avoid deckstates that would otherwise be very good. I run it as a 2-of, like most people; I could sort of see cutting it down to 1 to keep that threat alive, but I’d prefer to have a better chance of actually being able to follow through if the opponent ignores the threat, forgets about it, or just can’t avoid running into it. And on the other side, I could see bumping it up to 3 (or putting in the Chisato level swap), since there have been times when I’ve wanted it but not had it; I find it a bit hard to justify spending that many deck slots on something that’s often just a brick, though, particularly since it’s a whiff on the level 0 Amoris and the level 1 combo. And there are plenty of games where I do see it.
Since this deck has very little ability to find events — depending on how the game goes, I might not even clock past level 0 — I hold onto this card from mulligan, and generally don’t drop it until the finishing turn, if then. So it’s honestly possible that this deck would be better without it, but I don’t feel like holding onto it has been difficult, at least.
Level 1
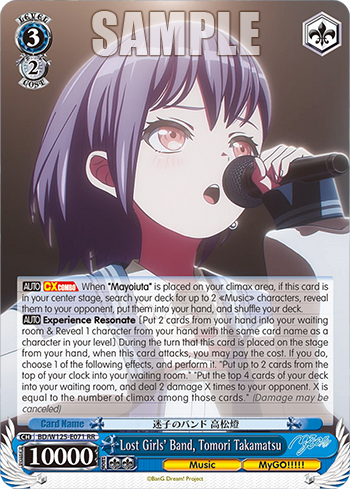
Level 1 combo & changer:


The core of the deck — or a large part of it, at least. As mentioned above, the controllable deckspeed this combo gives you works well with the crusch ability from the brainstorm to help you play towards cancels; and the ability to get either hand or stock lets it snowball well when the opponent has a bad game and isn’t able to take out all your lanes, or when you hit a lot on your brainstorms. And since the changer and the option to get stock both pump an extra 1k, this combo can get weirdly big, reaching up to 9k; this makes it pretty hard to wall out early on. And then it’s on bar, making it quite easy to loop.
Of course, a big benefit of this combo is the fact that it comes with a changer; in particular, this can let you triple combo and still effectively select into more combos for next turn. It can sometimes help with getting combos initially, but I generally don’t assume that a changer represents a combo on the first level 1 turn, since there’s no guarantee that there’ll be a combo in the waiting room to change into. Of course, the changer can try to mill one out with its mill 3 ability (and if you don’t mill one out, it can just sit in the back row for next turn… though that does run the risk of the opponent trapping it there, e.g. in the mirror). And the changer also means that you mostly don’t have to worry about too many combos coming out of deck; while other decks sometimes run into the case of not having any combos left in deck when they play a search riki, that’s practically never a concern with this combo. After you combo the first time, of course, those combos probably go to the waiting room to be changed into on the next turn; it can be quite awkward if they don’t, so you generally want to mill down to at most 4 or 5 cards in deck, or else minimize milling (which doesn’t necessarily mean stopping at 1 on every combo; it might still be important to mill more to find useful cards to grab). If you have the option to search for either the combo or the changer at level 1 (say 2 combos are in hand and 1 is in the waiting room), I think it’s generally better to search for the changer: that gives you a chance of triggering the 4th combo, so you can pay it out next turn and have it in the waiting room if the others aren’t there for whatever reason.
As far as downsides, the combo isn’t particularly selective, but the ability to get stock goes quite a way towards making up for that, by likely giving you an extra brainstorm, which is selective (if it hits). It can also be awkward that you need to mill in order to benefit from the combo, but honestly that’s kind of true for attacking in general. And it can’t get events; that’s perhaps more just normal than an actual downside, but it is fairly significant because of the stockswap.
These are both 4-ofs: the combo, of course, you want to trifield at least at level 1 and possibly into level 2; and you want to have a good chance of finding the changer off the combo. Some decks only run the changer at 3, but I think setting up for the next combo turn is too important.
Climax searcher:

While I am of course influenced in various ways by seeing other people’s decks and thoughts on deckbuilding, this is one of the few cases where I’ve directly borrowed a tech from someone else’s deck. So shoutout to Steve L (who, incidentally, got 2nd in Duluth, though not with Bang Dream). This card reads as pretty expensive, and honestly it is (especially in the not-unlikely case that you play over it, and/or if you have to spend extra resources to sculpt into it), but there are definitely times where it’s worth it. In particular, if you need to mill (and have at least one climax left in your deck), you can use this to enable you to combo, milling through your deck while making back the resources you spent. Or perhaps you’re not hurting for resources and the opponent is uncompressed; this can let you take advantage of that, rather than just swinging for 1s. At level 3 you’d generally prefer to use the Anon to grab a climax, but this is another possibility if that’s not available. As a tech card, this is a 1-of.
Antichange:
I threw this in right after Vancouver (the week before Duluth), and I did in fact get some use out of it. There’s definitely some potential for this card to be more harmful than helpful, either if you use it and then find that spending 3 hand was a bit too costly, or if you sculpt it or hold it and then never end up using it, so I was a bit worried that I was just making my deck worse, but I think it’s overall a good addition. This is a deck that prefers to be ahead in damage, rather than aiming to regularly finish from level 2, so removing an attack can be very nice even when it’s not removing a particularly important target. Ideally you’re saving a level 1 combo with this, which then goes some way towards making back the resources you spent on it. It’s also just a 1k backup, which can sometimes come up, particularly if the opponent is using utility level 1s or oversize level 0s to take out some of your combos.
It’s not ideal that this is a clock antichange, since that means that the opponent can turn it off by healing down to 2-0; I think this is still the best antichange option, though, since it’s available at level 1 and it actually removes an attack. A lot of Bang Dream decks don’t run any antichange at all, which can potentially make this more effective if you naturally draw it and the opponent doesn’t see it, since it’s more likely that the opponent will assume that you don’t run it; on the other hand, if the opponent does see it, that gives them more information than they’d get from a deck that doesn’t run it.
This isn’t a particularly important card to the deck, and so I only run 1. There’s always an argument to run one more antichange to increase the chance that the opponent sees some of them and assumes you’re not running any more, but honestly I don’t think that’s too likely, to either happen in the first place or be especially impactful if it does; a lot of the time the opponent doesn’t care that much if you antichange, and for cases like Overlord where they care a lot, they’re more likely to play it safe and assume you have one anyway.
Level 0
Brainstorm:
This is another core card; I’ve already talked a lot about the crusch ability that it can give out on climax play. Of course, it’s also a salvage brainstorm, and that’s very important as well (but also very normal). The back row should pretty much always be two of these (though it can be nice to keep one in hand on the first level 1 turn if it means you don’t play over a riki or something that could potentially be pushed up next turn, or at least that then stays out of the refresh). Since you want to see two of these fairly early on, it’s of course a 4-of. It’s also one of the only sources of red in the deck.
Having a double brainstorm backrow is very nice for looping the level 1 combo; and since that combo has the option to get stock rather than hand, it generally doesn’t feel bad to just mash brainstorms (at least if you’re somewhat compressed). On the first level 1 combo turn (or possibly later if you end up with an awkward refresh), you can also brainstorm to try to mill out a level 1 combo to change into.
Moca riki:
I think of this deck as having 7 rikis, by which I really mean 7 clock-self cards that can search the level 1 combo. The first 3 are moca rikis; I run this at the highest count because it also works as a first-turn plussing 0. It’s fairly small, though, at 1.5k, and there’s the potential for the opponent to deny it. The alarm ability generally doesn’t matter, but it can occasionally come up.
Yukina riki:

The second type of riki is Yukina, which is on-play rather than on-death. That mostly makes it a bit worse than the Moca riki, but it can be nice if you need to search out a climax swap, to give you a sac target. The bounceback on cancel is another ability that occasionally comes up but is mostly ignorable. This is a 2-of since it doesn’t work as a turn 1 attacker. Honestly, the biggest reason I included this is that it’s blue; if I didn’t need that, I might run more of the other “riki”s instead.
Ruijerd:

I wouldn’t normally call this a riki, since it costs hand rather than stock, but it still fills much the same role. The fact that it doesn’t cost stock means that you can easily level up to level 1 from 0-4 (before clocking) on turn 2 going first (or similarly, to level 3 from 2-4, though I’m generally more likely to go for EP heals in that situation, since this deck doesn’t have an especially explosive finisher). This also works as a turn-1 attacker, though it doesn’t plus you (but if you need a plussing 0, it can search out the Amoris; that does mean it’s not searching the combo, though, unless you get lucky with Amoris’s topcheck). That said, at 2.5k it’s bigger than a lot of level 0s, so it can sometimes randomly survive (and it can also help take out opposing 2ks). Rather than searching for level 1 or lower characters, this searches for «Ave Mujica» characters, which limits what it can get; it’ll pretty much always be either the combo, the Amoris, or, if you really want to clock up, the other copy of itself. It’s a 2-of since it doesn’t plus.
Drop search:

The 8th card that can search out the level 1 combo. This is a nice card to have if you’re climax flooded, and just in general provides some extra selection throughout the game. Plus it’s a bit of extra blue. It’s just a 1-of since the drop search is a bit inefficient and you don’t always have a climax that you want to ditch, but it could easily be bumped up to 2.
Helmet:


A good source of selection; not the most efficent, but still more efficient than something like a drop search that you end up playing over anyway. A 2-of since it’s almost always somewhat nice to see, but you don’t want to be using it too much since it does cost hand. In a sense, it’s the 9th and 10th copies of the level 1 combo, which is to say the 6th and 7th cards that you can grab off the combo when triple comboing that guarantee you a combo next turn (so long as the attacking combos end up in the waiting room). But of course, it’s a lot more flexible than that.
This helmet has a blink tacked onto it, which does nothing in a lot of cases, but can be very impactful against some decks (like Spy Family — note that the card comes back from memory standing), and is an annoyance to the opponent in other cases.
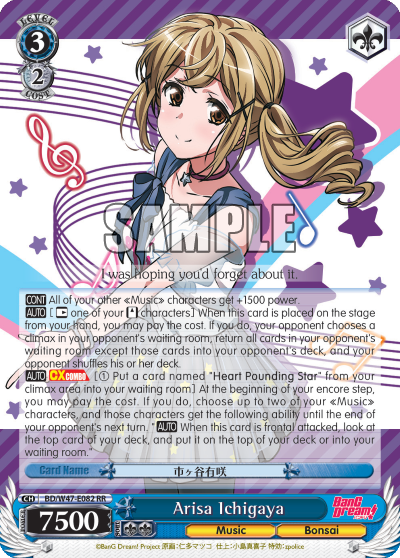
Climax swaps:

With the finisher being on bar, I want to run 2 climax swaps, to have a decent chance of seeing (or being able to find) at least one of them. Of course, with the level 1 combo also being on bar, there are plenty of times where they’re not needed, so I don’t think I’d go higher than 2. Initially I had 2 of the Taki climax swap, since it sacs a character rather than paying stock, plus it’s blue; I changed one of them to the Masuki because there seems to be a decent amount of 8 standby Hololive in the meta, and this is a cheap and easy response to that. In particular, it makes it harder for them to force fronts to enable the tap counter (though there are level 3s other than Luna, of course, so it’s not foolproof). Still, there are times when paying stock is better than sac’ing a character, and being green can also be nice (it makes it accessible from clock, for one thing).
I think it’s important to have at least one sac climax swap, to be able to riki for it when you only have 1 stock (for example, turn 2 going first); in that scenario, you can sac the riki, and so you’re effectively just paying 1 hand and 1 stock for the climax swap, or 0 hand if you needed a third attacker anyway. (Of course, that only applies to the Yukina riki; if it’s the Moca riki, you do need to find something else to sac.) It’s also not unusual to have a riki or a ruijerd or something sitting in the back row, which you can potentially sac for a climax swap next turn.
The Taki also pumps cross-turn power on attack, which can occasionally come up; on the other hand, the Masuki has 500 more base power.
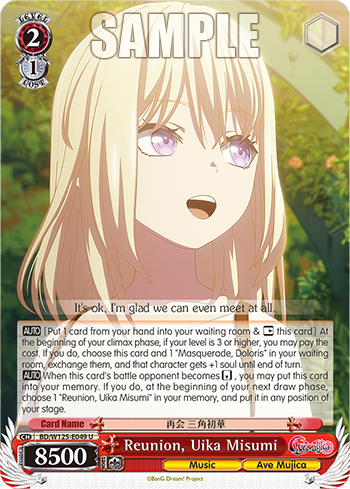
Amoris zero-two:
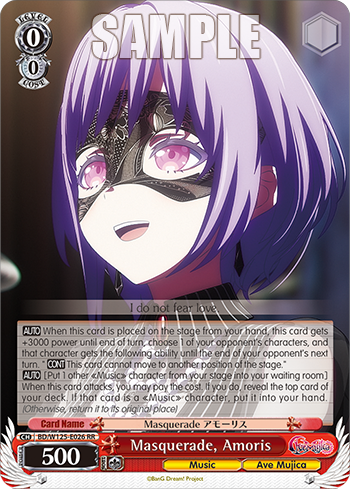
The other plussing 0, besides the Moca riki. It can also make you more likely to trigger bars; there have been times when I didn’t have the level 1 climax in hand, but got it because of this Amoris. It’s also the main beater of the level 0 game, reaching 3.5k on offense on its own. It’s a bit awkward that it’s the only level 0 in the deck to do so, though: it’s not uncommon to sac something else with an Amoris that’s tying, and thus leave two empty lanes.
On top of that, this also prevents one of the opponent’s characters from moving, which can make things a lot more awkward for the opponent, particularly if they’re playing standby (though of course, it can also not make a difference at all, depending on the situation). It’s a bit of a toss-up whether or not you can use this on the turns where it’s most impactful, since it’s not a normal part of the gameplan past level 0, but if you know it’ll be important, you can often hold onto a copy, and it’s fairly likely to be available in the waiting room to grab off a brainstorm.
This can be a nice card to play to maintain hand when you don’t have a climax, though it’s even better when you do have a climax, on account of the brainstorm being able to give it the crusch ability, to give you a bit of control over what you get. (Or if you see a climax and want to trigger it, you can simply opt not to sac anything.) That said, this doesn’t work great alongside the level 1 combo, since you want the combo to be in your waiting room next turn, and thus you don’t want to sac it before refresh.
This is also a good card to level for red, particularly in matchups where it’s not especially important to be able to lock opponent’s characters in place or leave empty lanes.
A 3-of since you want to see it early but it’s not the only plussing 0 in the deck.
Rui:

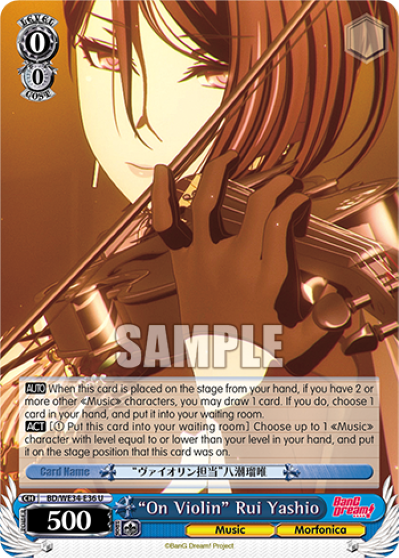
This card effectively converts a hand into a stock when you’re playing a cost 2 character. The Layer finisher does need hand (unlike some of the other options), but it’s certainly still possible to find yourself with extra hand and not enough stock. In a pinch, you could even go below the necessary amount of hand and hope to trigger a bar (which the brainstorm can help with). In the midgame, you can also use this to play EPs; notably, it’s the most efficient way to play multiple EPs in one turn, since you can play it to fulfill the EP condition for the first EP and then sac it to summon the second, without playing over anything. (The helmet is also a very reasonable way to double EP, doing a similar thing of counting towards the EP condition and then sac’ing itself; in terms of raw hand count, though, it’s the same as playing over a character.)
This also has a draw/drop ability, which can help dig for a climax or buns, and gives it a bit of utility if you need to play it as an attacker early on. It’s pretty rare to play it just for that ability, but it’s a nice bonus.
It’s a bit of extra blue, but more importantly, it can let you play a character without needing color, meaning that the fumio is live even if you’re not able to (or choose not to) level blue at level 3.
A 1-of because it’s not super useful early on. It’d be nice to run a second copy (or more likely, a copy of the Kanon below), but deckspace is tight. There’s also some potential to reuse it by grabbing it back with Anon (or a helmet, though that means you’re spending 2 hand for a stock). It also lets you gamble on hitting 2 on a brainstorm on your finishing turn to get a free salvage (particularly if you’ve got an extra stock that otherwise wouldn’t be useful anyway).
Yuri:
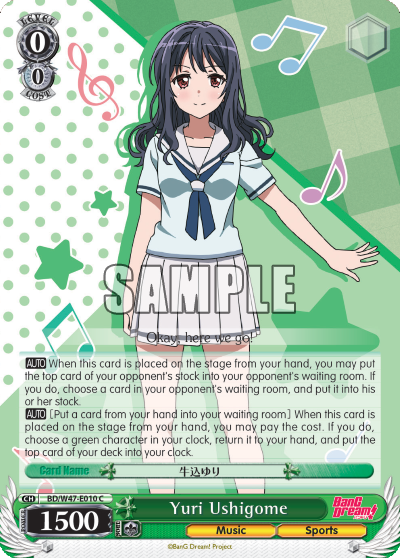
This card can throw a climax into the opponent’s stock (so long as there isn’t a climax already on top); this can let the fumio exclude two climaxes rather than just one, or it can make the opponent refresh with one less climax if they refresh during your attack phase (for example if they left 1 card in deck). It also provides clock access for green characters, which is half of the deck (exactly 25 cards, in fact, excluding Yuri herself). This means it’s a nice card to look for in the Nikke matchup, for example, to grab a level 1 combo that got turned into damage. And just in general, it means that you’re not too sad to see stuff like combos (either one) or EPs get hit into clock.
This is a 1-of because its primary use case is on the finishing turn, and clock access, while nice, isn’t reliably selective. I’d like to run another copy, and it’s possible that it would be worth it since it has a reasonable chance of being able to sculpt into either the level 1 combo or the changer, but ultimately I don’t think that’s quite enough. It’s also always a bit worrying using it at level 1, because of the potential to put a climax into clock.
Cards Not Included
Other finishers:
I touched on this earlier, but I feel like the common finisher options for Bang Dream all have some sort of downside that Layer avoids (even if they can potentially provide more finishing power).
- Doloris:

Doloris is weak to defensive counters; if the opponent can blank one lane and eats another, for example, then you only get a single burn out of triple combo. Like most cancel-burn finishers, it’s weak to minus-soul counters — but it’s also weak to plus-soul counters, on account of repeating the same amount of damage that was cancelled (though of course, there is the chance that they eat the second 9, I suppose). It’s also the most expensive finisher: double Doloris + Anon costs 2 extra stock compared to double Layer + Anon, since it needs 2 stock going into the attack phase; it can make that up by time machining twice ahead of time, but only if those don’t replace level 1 combos (or Amoris). The time machine does mean that you effectively run more than 4 copies of your finisher, but Layer’s search serves a similar role of minimizing the sculpting needed. - Tomori:
Tomori doesn’t work well with buns, since that means you need to fit 3 colors and a reasonable resonate condition in your level; that’s not a huge problem, but it’s still a bit of friction. This combo is also worst in the situation where you’re most likely to need to hail mary a finishing attempt, namely when you’ve got a thick deck and you’re out of climaxes (or near enough). And it requires the most sculpting; you generally have to start collecting Tomoris fairly early, and there’s less ability to grab the fumio on the finishing turn, for example. - Anon + Tomori:
The Anon + Tomori package takes a lot of deck slots. You also have to judge when you’re about to go for the finisher, and aim to clear your board so your opponent can’t crash all lanes and tank the effectiveness of your combo. With more character tap counters in the meta (particularly Overlord and 8 standby Hololive; Fairy Tail is also on its way, I suppose), I’m a bit tempted to go for this combo, but I feel like I’d be giving up a significant amount of early-game consistency. - Lisa:

This Lisa is similar to Layer in being a simple finisher that requires minimal sculpting, and triple Lisa is 1 stock cheaper than double Layer + Anon/Oblivionis. But it takes a bit more deckspace, on account of needing to include shufflebacks; it would be nice if you could shuffle back copies of Layer as well, to be fair, but you have to option to salvage them, which doesn’t work with Lisa (at least if you can’t afford the extra stock and hand to hardplay them as well). Lisa also doesn’t work as well with Anon as a third lane, which means you care more about finding the climax ahead of time.
Burn 1:

This is the card I cut for the antichange. It’s basically just another off-finisher, but it has the benefit that if you have exactly 8 stock, you can play double combo + this + one of the other off finishers, since it doesn’t use any stock during the attack phase. There’s also potentially some benefit to burning during the main phase, like being able to stockswap after refreshing the opponent or fumio after getting their clock into refresh; those are fairly niche scenarios, though. It can give you an attack where the opponent can’t play either events or backups, which might be nice against character tap counters, but it’s just one lane. Ultimately, I felt like it wasn’t too important; it’s also just a burn 1 (and possibly not even that, if it whiffs), which can often end up not mattering anyway.
Bouncers:

I basically just figured I wouldn’t run into Shana, and I was right. A bouncer might be useful against tap counter, I suppose, but there’s a decent chance that it means you lose an instance of damage anyway, because of the extra resources required. The Mutsumi’s alarm ability might be nice, but to get that at all reliably, you have to have already sculpted it, clock it, and then not heal it off (and also not put something on top of it with refresh or Yuri, unless you heal that off), so it’s hard for me to imagine it coming up. Also note that the Mutsumi, like the others, does not have the «Ave Mujica» trait and thus cannot be searched off the (Mutsumi) ruijerd.
Timoris chiyuri:

Basically, I’d prefer level 0 cards that can directly search the combo (or whatever) rather than just looking at the top 4 cards. While the changer does mean that there are sort of 8 combos, and so you have a roughly 50% chance of finding one of them (the same as the chance of hitting a brainstorm), that only works if there’s a combo in the waiting room to change into (and one that you’re not already changing into with a different changer). There have been some times when I’ve wished I had a bit more deckspeed, but that’s mostly when I’m doing the level 1 combo on turn 2, when I wouldn’t have necessarily had a lot of opportunity to play this card anyway. If I did put this card in, it likely wouldn’t be a 4-of: the free stock isn’t especially likely regardless (a 23% chance, max, in first deck), so I’d prefer to optimize for seeing stuff like plussing 0s.
2/1 Amoris:

In Doloris builds, this card can help the time machine get reverses, but it sees play in other builds as well; I suppose the extra draw is nice, and making the level 1 combo swing at 9-11k is nothing to sneeze at. But it’s not much of a consideration for me simply because I want to keep the second brainstorm in the back row and get the second crusch ability.
Oblivionis climax swap:
This has the advantage over the climax swaps I currently run of being a bomb (which can be nice if you randomly open it at level 0 and don’t feel the need to hold onto it) and of being searchable off the ruijerd (useful if that’s your only searcher going into level 1 and you need to climax swap). But at the end of the day, I just don’t want to pay stock to climax swap; if 8 standby Hololive falls off, I’d probably just swap to two of the Taki climax swap (which is what I ran in Pasadena).
Kanon:
This card serves basically the same purpose as the Rui of converting hand to stock, but it’s not blue and it doesn’t let you cheat colors. It works earlier, before you start playing 2-stock characters, but on the other hand it’s generally a worse attacker at level 0 on account of not having the draw/drop ability. Instead, it reveals the top card of your deck (and I suppose can let you pay 1 to look at your deck and shuffle it, if you reveal a «Music» character); that can be useful later on, for example to decide whether to brainstorm or mill 3 from the changer first. Ultimately, I just feel like the Rui is better for this deck, and I can’t justify a second slot for the Kanon.
Chisato level swapper:

This could give you more reliable access to stockswap, by levelling it and then using this to grab it out of level. I’d probably run this over a 3rd stockswap, since this deck doesn’t work great with events, but it’s hard to justify replacing the 2nd, since at that point I’m not sure how likely it is to even get the 1-of stockswap into level. Also, part of the benefit of buns is how cheap it is; if you set it up so you almost always have to use this Chisato to access it, then it’s suddenly not particularly cheap at all, costing 2 stock and likely 2 hand (if you end up playing over the Chisato).
Potential Post-Banlist Changes
It seems fairly likely that Bang Dream will get hit on the banlist pretty soon; and if it does, there’s a decent chance that it’ll be the same as the Japanese hit, a choose 3 between the fumio, the stockswap, and the changer.
If that happens, I’m thinking I’ll stick with this deck and just cut the stockswap and fumio; even though I originally switched to this finisher in order to be able to play buns, I don’t think I’d switch back.
First off, I’d probably bump the Yuri up to 2, to be more likely to see it, with the idea being to make it harder for the opponent to get compressed in the first place.
There might be an argument for running a different stockswap, but this deck doesn’t have enough «Roselia», «Raise a Suilen», or «Anniversary» characters for that to seem worthwhile. (I wouldn’t consider paying 5 stock for a stockswap worthwhile; 4 is already pushing it.)


Instead, I might throw in the off-climax icytail; it’s not a great answer to compression, but it at least gives you something to do in the cases where you’d otherwise be running headfirst into guaranteed cancels.
And at that point, perhaps I’d run the changer to it as well? Preventing backups (and events) in a lane could be helpful.
If I didn’t run the changer, I might bump the drop search up to 2, or throw in the Kanon or the TD burn 1 that I ran previously. Or maybe a bouncer, or another antichange (perhaps one that works when the opponent is at 2-0). Basically, it’s just an extra slot opening up.
Of course, we’ll have to see what happens, though I doubt there’ll be a huge hit, since the set is still fairly new (this BCS is its first full competitive season). I’ll probably stick with this deck so long as I can still run 4 each of the level 1 combo, changer, and brainstorm.
Tournament Report
Since Bushiroad has already posted the event report for Duluth, I suppose I can look up my opponents’ decklists there, for a bit of extra context.
Round 1
I won against NIK Sakura Standby / Modernia Door (106th place), going 1st.
They seemed like a fairly new player, and they started off by trifielding turn 1 going second with a fukaziroh, a helmet, and a Scarlet riki. I suspect they had another riki in hand, at least (they played one the next turn as well), but they followed that up by playing a door with no combo, and at that point they were pretty much completely out of hand. They did have a brainstorm, but I think that mostly whiffed. (I tried mentioning after the game that they could have attacked fewer times turn 1, but I’m not sure how well I was able to get that across.)
The idea of the deck was apparently to use the Sakura combo to fuel hand for the Modernia icytails, which seems like a reasonable spin on the standard door/standby build, but in our game that didn’t even come close to happening.
On my side, I was able to get triple combo turn 2 (using moca riki, ruijerd, and changer), and then they crashed all lanes, so I was sitting pretty in terms of resources, though I did take a decent amount of damage (their empty door slam hit me to level 2). This might have been a rough game if they’d been able to keep up the pressure, but as it was, they fell behind in damage and then I was able to finish them off with double combo + the encore step burn.
Round 2
I won against BTR 5 Door / 3 Bar (Bocchi / Ryo) (12th place), going 2nd.
I cancelled early and so had two turns at level 0 despite riki’ing twice, which was nice because I didn’t yet have the level 1 bar (I searched out an Amoris and got the bar because of that, triggering it on the last attack after hitting Amoris’s topcheck). I think they could have gotten a stock bomb to deny my Moca riki, but got the climax swap instead (which they later used to get the level 1 climax). At one point I triple triggered bars, but I was able to ditch 2 of them the next turn with the Yuri and the helmet. I actually used the antichange counter this game, though I think it was on the opponent’s second level 2 turn since they were 2-0 the previous turn (after healing, I think). I was 2-5 the turn after antichanging, and made sure to heal down to 2-4 since the Ryo finisher is a bunch of 3s, though I did leave two empty lanes (crashing into Kita EP and Dino Bocchi), so there were some 4s in there. I then double triggered bars; I had the option to mill one of those, but opted to take the trigger since I was fairly low on hand (on account of using the antichange, I suppose). That was probably a misplay, because I left myself more vulnerable to the fumio (which I’d seen them grab earlier, but then forgotten about); however, they weren’t able to get yellow, so they just stockshuffled, and that ended up putting no climaxes at all into my… I think 8 or so stock. I don’t think I had any finishers in hand going into my finishing turn (having ditched one for the antichange), but I was able to find something (I think the Anon), and from there ended up with a reasonable finishing turn (though I didn’t record the specifics).
Round 3
I won against NIK Modernia Door / Biscuit Standby (46th place), going 2nd.
They triggered a door early on that I don’t think ever got paid out. I think I hit 2 on a brainstorm (my last 2 climaxes) on turn 2, and did triple combo to mill out. Then they did triple Modernia (hitting the stock on all 3), and I took 9 damage. I double EP’d and played over one of them to do double combo, and got the antichange off the combo. They didn’t play Alice (possibly afraid of the antichange?), and then next turn I hit them to level 3 from 2-2. They hit me to 3-5 and standby’d out a Sin; I only had 1-soul characters but they went for it anyway, and then I cancelled the 1. I finished them off with double combo + Anon (I believe I ended up with no level 0 characters in deck, and was able to find a level 1 for the Anon burn; I guess they were 3-5 at that point).
Round 4
I won against TSK Milim Door / Mjurran Pants (32nd place), going 2nd.
Turn 1: I was able to use Amoris to take out their chaser, alongside two Moca rikis.
Turn 2: They did single Milim combo, and got a Mjurran off it. I did triple combo with no backrow (and got a couple brainstorms off the combo).
Turn 3: They played 2 Mjurrans and Shuna but didn’t have the climax; they’d triggered 2 pants on the previous 2 turns, but both had whiffed. They ended up pretty compressed I think, but I didn’t stockswap since they only had 3 stock. I committed my brainstorms (a bit worried that they’d end up doing the Milim combo again, but taking that chance) and EP’d.
Turn 4: They climax swapped into triple Mjurran, and hit me to 3-5. They were 2-5 at this point, and I had 5 stock, but I hit 2 on a brainstorm, which let me grab Rui and a level 3, and then I was able to use the helmet and the ditch-climax-salvage to get Rui back and another level 3 (I don’t think I had any sort of finisher left in deck), letting me do double combo + encore step burn (in the back since they’d searched out memory kick), which ended up being just enough to kill: they cancelled three 2s but ate a 4, a 3, and the final burn 2.
Round 5
I lost against HOL 8 Standby (AZKi / Choco) (1st place), going 2nd.
I drew into both the antichange counter and the Masuki climax swap early on, and held onto them; I don’t think I ended up using the antichange at all, but I did use Masuki to bounce a Luna at one point (and also climax swap, I think). Overall, I feel like this game went fairly well for me, except for the fact that they triple cancelled 3 turns in a row, so I ended up significantly behind in damage. I had to go for the finish when they were 2-1 or so; that turn was pretty sloppy since we were getting close to time (I probably could have played quicker earlier on), but I don’t think I was particularly close to killing regardless. I think I did have the stockswap this game, but they never had that much stock, or were in a position where the stockswap seemed especially effective.
Round 6
I won against TSK 8 Pants (Shizu / Mjurran) (22nd place), going 1st.
I was able to use the antichange as a simple 1k backup in this game, since their level 1 combo only swings at 5k. They then cancelled to stay at level 1, and ended up crashing into my level 1 combo with some 0s, letting me snowball quite a bit. They triple Mjurran combo’d the next turn, but they were already 2-5, and they double triggered. I milled to refresh since I was crashing my level 1 combos, only realizing as I did it that I had enough stock for that to be a very questionable decision: I think I refreshed 19 cards with 11 stock. They did stockswap into Shion, and I ended up taking 8 damage from the Shion after cancelling the first attack, and refreshed 2. At that point I was 3-6 and they had one swing left, which was for 1, but they triggered and I managed to cancel with one of my 2 climaxes. I was then able to search out my last climax with Chisato (and then climax swap, since it was a level 1 climax), to get double combo + the encore step burn. (I think they were pretty close to dead anyway, but they mentioned afterwards that their waiting room was clean so I probably should have fumio’d; I think the fumio had ended up buried in stock, though it might still have been accessible if I’d tried for it.)
Round 7
I lost against 5HY 8 Nino Standby (6th place), going 2nd.

I only attacked once on my first turn since I only had 2 level 0s and one of them was a Yukina riki. I triple combo’d turn 2, but ended up milling out a number of climaxes, and I don’t think I found much to help me combo again next turn. I used Amoris to trap a 1/1 in the back, but they just hardplayed a couple more, and then next turn I ended up crashing into them. At one point I ended up actually being able to use the Moca riki’s alarm; I assigned the ability but forgot about it by the time I actually reversed the character, but my opponent remembered and did the clockswap thing anyway. I ended up at 3-0 while they were low or mid level 2 with two of their level 3 combo in the back. I stopped one of them from moving with Amoris and salvaged my level 1 combo with Anon (I probably should have kept the Anon in the back, in retrospect, since I didn’t use the burn, but it didn’t end up mattering). They used their burn backup and I cancelled with the last card in my deck, refreshing 5 since I’d triggered, and then I think I just ate 7 damage.
Top 16
I won against AZL 8 Pants (Anchorage / Pamiat’ / Enterprise) (10th place), going 1st.
They stock-bombed the Moca riki I opened with, but I had a Yukina riki and another Moca riki anyway. I played Amoris and ended up sac’ing the Yukina rather than the Moca because I wanted to wait to riki until I had more information, though I guess that was a bit risky since they could have stock-bombed that one as well (but I don’t think they did). They had two turns at level 1 but didn’t have the level 1 climax, and then they triggered a pants on the second turn and grabbed it. I suspected they had the level 2 climax as well, since they’d grabbed the level 2 combo; and they ended at 2 cards at 1-6, so I opted to side for 1, and put their clock into refresh. I was able to end at 2 in 4 two turns in a row (milling to 2 in 5 with double crusch on the last lane, then seeing a clean card on top). I think I was low to mid 2 when they went for double Enterprise; they hit all 4 of the burns, but I also cancelled all of them, only eating a 2 and a 4. Then I was able to do double combo + Anon + encore-step burn; they were 3-0 with a couple climaxes left in a small deck, but I figured an extra burn 2 was still better than the fumio. The first combo’s burn cancelled and then I saw the last climax with the pseudo-moca; they had 4 cards in deck, so I put the climax on the bottom and stuck the swing for 3, and then I stuck another 3 after refresh.
Top 8
I lost against HOL 8 Standby (AZKi / Choco) (1st place), going 2nd.
This game was one of the top cut games recorded by the Refresh Point; you can watch it here.
I only got double combo because I confused myself and thought I they were all already in waiting room (I did trigger two of them turn 1). So I helmeted for a brainstorm rather than a 3rd combo, which is still pretty reasonable. However, I double triggered and then ate 8 damage I think. They used the Choco combo, and I’d ditched my antichange in mulligan (though I doubt it would have been worth it to hold onto it). They ended up with Choco, a 5k Lui, and a Miko drop search. I used the Taki climax swap and did double combo, using the changer for one of them. I put both the changer and the power pump from the Taki in the Lui lane, putting it to 9k, with my thought being that I’d get hand from that combo and stock from the other one (to tie Choco at 8k), but then I revealed 2 climaxes, a stockswap, and a Yukina riki, so I just put the riki into stock. In retrospect, I should have put the changer in front of Choco and committed to getting stock in the Lui lane; if I got one stock and one hand like I was planning, that would have had the same result of beating over Lui and tying Choco, but it would have had the benefit that if I didn’t see a good card on the combo that I was planning to get hand from and instead got stock in both lanes (as in fact happened), I could have gotten over Choco instead of just tying. But at any rate, I just continued to eat damage, ending up at 3-1 and then dying the next turn.
Overall, I definitely made some misplays, but I don’t feel like any of them ultimately ended up losing me a game I should have won. There were some awkward games and situations, but mostly the deck did what it was meant to do. In particular, I triple combo’d on my first level 1 turn in every game except the last (where I could have if I hadn’t confused myself), including twice when that was turn 2 going 1st and four times when it was turn 2 going 2nd. (The same is true for at least 10 out of the 14 games I played in the previous two BCSs, as well; there’s also one game that I’m not sure about, and one where I kept the 3rd combo in hand because I didn’t want to mill that much.) So I feel justified in saying that this deck very reliably triple combos, in a way that other decks don’t. I was also able to consistently get at least 6 instances of damage when I went for the finish (though there were a couple games where I tried unsuccessfully to sandbag a turn at 3 because the opponent was low to mid level 2); this doesn’t hold up as well in the previous tournaments, though I did use the fumio a decent amount there. The one thing I wasn’t able to do (as I mentioned earlier) was use the stockswap.
Conclusion
Unsurprisingly, I think this deck is very good; and I suspect it’ll continue to be good after the banlist. Looking forward to BSF, the existence of Re:Zero might make a more explosive finisher more attractive, since in that matchup it’s difficult to aim to survive their finishing turn, and you’d likely prefer to try to kill them first. On the other hand, perhaps you can aim to be far enough ahead in damage that it’s pretty reasonable to survive; I haven’t actually played the matchup so I don’t have a good feel for how it’d go.
In general, the Oblivionis combo combined with the Soyo brainstorm gives you a lot of deck speed and deck control, and the potential to snowball heavily in good games where you hit a lot on your brainstorms and/or your opponent isn’t able to take out all your combos. On the other hand, when you eat damage and whiff brainstorms, you can often end up just milling through your climaxes and praying that the next deck is better. There’s a lot of potential to loop the level 1 combo (between the changer, the helmet, and the salvage brainstorm), but there are some games where it just doesn’t happen.
My build focuses the level 0 game on getting to the level 1 combo quickly and reliably; in particular, I feel like that maximizes the chance that the opponent won’t be prepared to take out 4.5ks in all 3 lanes, since they likely can’t triple combo as consistently.
Additionally, the 8-bar climax lineup frees up the trigger control from the brainstorms to let you play towards leaving cancels in a small deck, rather than needing to focus on avoiding early triggers. Combined with the cheap EP healer and the general deck control, this helps you aim to get ahead in damage over the course of the game. On the other hand, the deck has very few soul triggers and doesn’t do much to contest board (though the level 1 combos can get quite big), so there’s definitely the potential to fall behind if you eat a few big instances of damage.
The finisher isn’t very explosive, but is quite reliable; in particular, the search on play makes it fairly easy to find what you need, or to pivot to a finishing turn earlier than you expected. Being on bar means that you often end up with the climax in hand naturally, but there are also ways to grab it. The combo naturally prevents event counters, but backups can still be an issue, and you likely don’t have the combo in every lane. While it’s possible for the deck to kill from level 2, you’d generally prefer to hit the opponent to level 3 first.
While the deck can definitely have bad games, I suspect they’re less common than many other decks’; being out a bunch of climaxes early rarely feels like a death sentence, for example (though of course you’d still prefer to get a few cancels or maybe hit a brainstorm). And on the other end of the scale, the good games can be really good. In particular, one nice thing about the bar trigger is that if you get enough resources, you can simply not take the blind stock and then ditch the bar for hand limit, meaning that you can avoid the risk of suddenly losing your compression to double or triple triggering, particularly since you can generally mill to refresh if necessary. (Though of course the flip side is that if you do need resources, you run the risk of losing 2 climaxes to a single trigger.)
And at the end of the day, I think this is just a fun deck to play. I like the consistency of triple comboing, I like being able to mill through my deck each turn, I like the freedom to double brainstorm often, I like not having to worry too much about setting up for my finisher. (If I’m being honest, I think the Anon + Tomori finisher is more fun on the finishing turn, but on the other hand it’s more stressful leading up to that.) I’m glad I’ve been able to do well with a deck that I enjoy from a series that I love (and of course, I hope to do better next time, and get that Worlds invite).

Leave a reply to 座布団 Cancel reply