The first deck I’ve made with the new Project Sekai set is 8 bag. This deck is focused around the 5-card check 3 bag brainstorm, the Shizuku level 1 combo that has a chance to get you free stock, and the cheap burn 4 Minori finisher.


Translations for set 2 cards (from Weiss Tea Time’s archive)
Translations for set 3 cards (which will presumably be moved to the archive in the future)
Table of Contents
Deck List
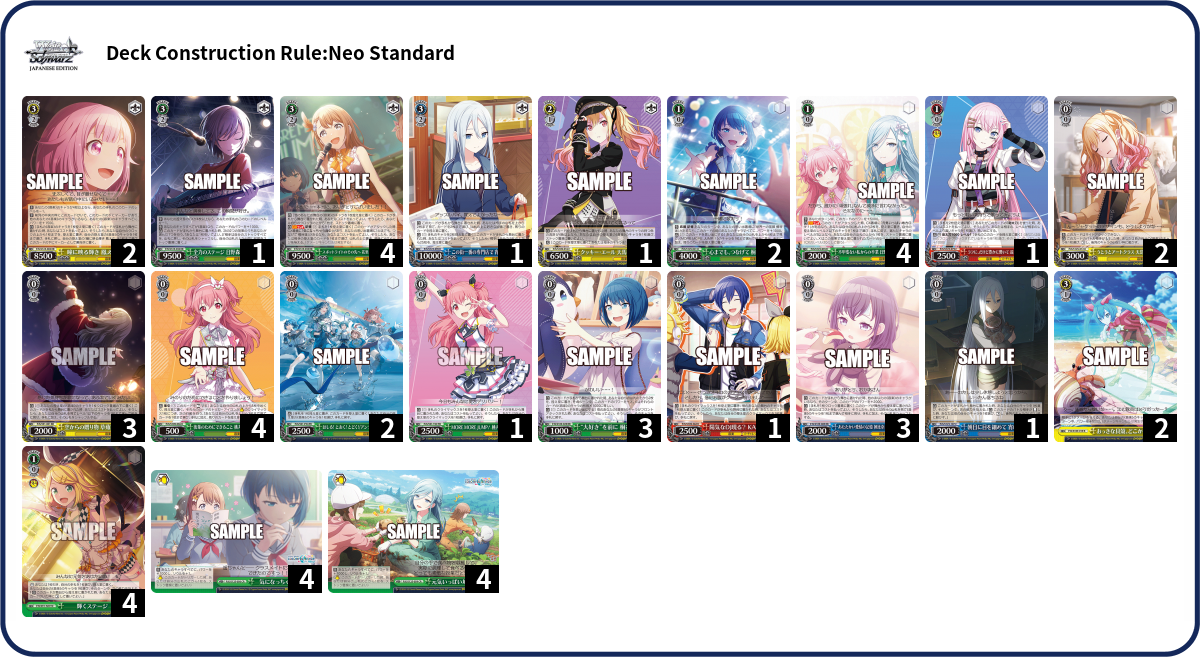
First off, here’s my current decklist:
Deck Log: 6D34X
EncoreDecks: KucjNNkK_
The deck name, “Bag推し”, is referencing the bag trigger and the fact that MORE MORE JUMP is an idol group; I’ve been a fan of the bag trigger for a while, maintaining that it mostly didn’t see play because it hardly had any good combos (in any set), so it’s not a huge stretch to say that my oshi is the bag trigger itself.
Deck Concept
This deck is a pretty standard 1k1 deck, I’d say. You’re looking to loop the level 1 combo as much as you can, and then play the finisher once you hit level 3. The backrow is generally double brainstorm; as 5-card check-3 brainstorms, that makes it relatively easy to find a climax and can provide a lot of deckspeed, though the downside is that there isn’t too much main-phase selection, and it can be difficult to mill only a small amount, particularly with the level 1 combo also milling.
With both the level 1 combo and the bag triggers giving you blind stock, it can be difficult to maintain compression, but there’s the potential to get a lot of resources. So the deck ends up being relatively finisher-focused, aiming to combine decompression tools with burn 4s (and potentially an extra burn 1) to hopefully be able to kill from mid or even low level 2, though spending resources on EP heals is also an option.
Individual Card Notes
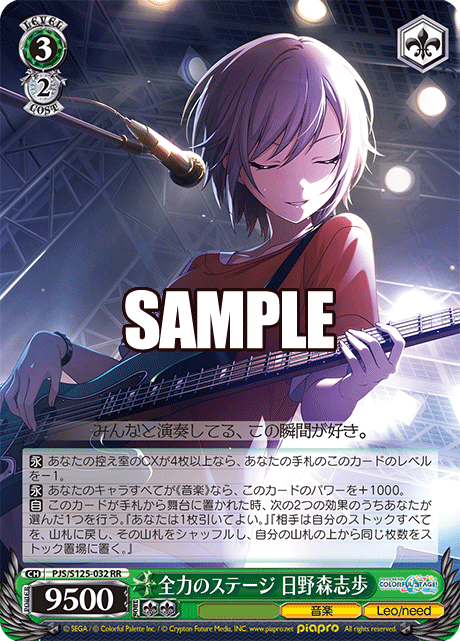
Level 3
Finisher combo:
As the main finisher, this is of course a 4-of. It’s quite a nice finisher even on its own, being both relatively cheap and quite explosive. If you have clock to heal to stock, it only requires 4 stock going into level 3 for triple (though the memory condition effectively requires an additional stock), alongside 8 hand (assuming you have to play 1 character to sac for the 3rd heal). While that’s a sizeable hand cost, the 5-card brainstorm can help convert extra stock into hand; if you brainstorm twice, the costs are instead closer to 6-7 stock and 5-7 hand (if you hit 1-3 climaxes on those two brainstorms; naturally there’s quite a lot of variance there).
The combo itself is a burn 4 that often only needs to stick a 3; this gives it a lot of reach, but while it’s not quite as prone to getting cancelled as a straight burn 4 would be, it still cares quite a bit about the opponent’s compression. So the idea is that you can spend extra resources on decompression, if necessary.
One sort of awkward thing about this finisher is that it doesn’t benefit from triggering bags on the finishing turn, so you can’t just play down a 3rd copy you can’t pay for and hope to trigger on one of the first two attacks. But probably the bigger issue is that you need clock to be able to save stock by healing, which makes it awkward to try to clock up to level 3 to go for a finish, or if you cancel a bit too much and end up at 3-0. If you have enough stock, you can of course just play the finishers without healing, but you have less leeway to brainstorm and use stock elsewhere; it mostly just means that the finisher is no longer cheap, but it’s still reasonable. There’s also a decent chance of refreshing on your finishing turn, which can provide another clock to work with, and there are ways to clock yourself without paying stock. And even if you can only afford double combo rather than triple, that can still be respectable.
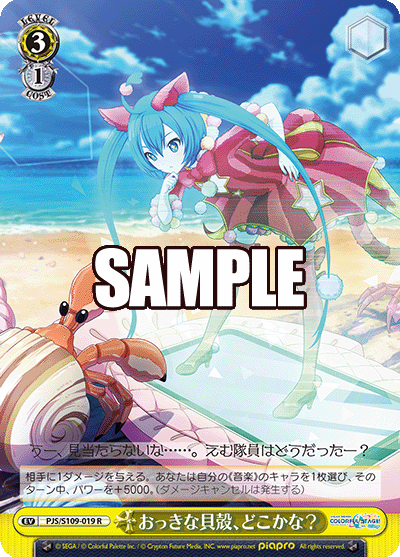
Stockshuffle:
Quite important, as the way to prevent the opponent from leaning into stock compression to counter your finisher. As a tech card, though, it’s just a 1-of; while this deck doesn’t have the best main-phase selection, it still has some amount of it, and you can potentially grab this earlier if you expect it’ll be necessary. It can also be played at level 2 if there’s a good opportunity for it (or even just as an attacker, perhaps if you need to pay out stock; that might be a case where you’d use the draw instead of the stockshuffle). The unusual early play condition of 4 or more climaxes in waiting room shouldn’t be too difficult to accomplish, so long as you’re able to brainstorm.
The big downside of stockshuffle, of course, is that it does nothing if the opponent leaves 1 clean card in deck with a highly compressed waiting room, but the burn 1 event can refresh them in that case.
Burn 1 event:
Having check-3 brainstorms means that it’s not too hard to find this event, and it can be used for a bit of extra damage if you have a bit of extra resources. It also has the minor benefit of pumping 5k, which can be nice if you’re not able to kill; the combo is quite small (only swinging at 10.5k with the climax), so it can sometimes be difficult for it to take out opposing level 3s otherwise.
Perhaps the most important role for this card is, as mentioned above, to let the stockshuffle deal with the case where the opponent has 1 card in deck. Similarly, it can be nice against an opponent who’s 2-6 with a small deck, helping to get their clock into refresh.
This is a 2-of, as something that’s often just a bonus (and so not essential to see every game) and not needed until level 3. It can be nice to hold onto a copy of this, but I don’t tend to worry too much about it.
One kind of cool thing you can do, if you have plenty of resources and are close to refresh, is to play the event and then brainstorm through refresh, to have a chance of getting the event back in the new deck and playing it again.
Moca/mill:

I initially had the fumio in this spot, but I switched to this card because I suspect it’s useful more often. The mill 25 ability, though it’s quite expensive, can still be used to get through an opponent’s compressed deck to an uncompressed waiting room; it doesn’t exclude a climax the way a fumio does, but it does make the opponent take refresh penalty, and it likely leaves them with cards their waiting room that you can stack on top of their deck with the combo.
But the main reason I wanted to put this card in is the on-play moca ability. If you have a couple extra stock — and especially if you want to play a character to sac anyway — you can play this down, and either it’ll get rid of a climax (or two), or the first burn 4 will have 3 guaranteed clean cards, making it very likely to stick. (Or 2 guaranteed clean cards if the opponent doesn’t have any in their waiting room, of course.)
There’s also some potential to use this to mill 2 clean cards to refresh the opponent and let you stockshuffle, though that’s probably only worth it in fairly extreme cases.
This is the only card in the deck that needs blue, but that’s not much of an issue since there are some blue level 0s that I want to run anyway, and it’s generally not the end of the world if you end up not being able to play this card.
Like the stockshuffle, this is a 1-of, as a tech card. While 1-ofs can be somewhat inconsistent, it helps a bit that in some cases, you’re fine seeing either this or the stockshuffle, or at least okay with seeing one of them even if you’d prefer the other.
Early play healer:
A 4-or-more EP healer, with the additional benefit of giving you some selection and potentially power. This deck doesn’t have a ton of yellow, so it’s often good to prioritize levelling a riki if you can.
It’s a bit awkward that the 4-or-more condition means that if you want to salvage a card to play this turn, you probably have to play over something, so I tend to use this to grab a level 3 (which the combo might not be able to get anyway). If you haven’t gotten the memory condition for the finisher yet, though, you could potentially use that to fulfill the EP condition and then send it to memory to open up a space. (You could still do that even if you already have the memory condition, but at that point you’re just spending a stock rather than a hand.)
As an early play, this can be a nice level 3 to grab off the combo at level 1 if you want to get the extra stock, since it can potentially be an attacker at level 2. (The same applies to the stockshuffle, I suppose.)
This is a 2-of; while it might be nice to run more, deckspace is (as always) tight, and this deck isn’t really looking to spam EP heals. Having 2 of them does leave the option to do that open, though: you can repeatedly play one EP and salvage the other, so long as you have the resources for it; perhaps the opponent is already close to dead and you just need to ensure you survive their finisher, or perhaps you’ve got some climaxes buried in stock and extra hand from hitting a bunch on a brainstorm, or whatever.
This card can also marker a copy of itself to become a global 1.5k in the middle position, which can let the level 1 combo swing at 9.5k, and is just an extra card of compression compared to a normal EP healer; at 2 copies, it’s possible to do this, but it’s also fairly likely that the other copy won’t be available in the waiting room, which is still fine (it just means that this card is a bit small for an EP, at 8.5k).
This card needs to ditch a character for the heal & salvage ability; it would be nice if it could ditch climaxes or events, but it’s still fairly likely that you’ve got a less useful character you can ditch, whether salvaged from a combo the previous turn, gotten off a check 3 from a brainstorm that didn’t have great options, drawn for turn, or whatever. And you can always salvage back the character you ditched if your hand is already sculpted (or if there aren’t any better options in your waiting room); you just need to make sure you have at least one character in your hand after playing the EP, I suppose.
Level 2
Bouncer:

The only level 2 card in the deck, a 2/1 sac-self bouncer. You’re not likely to have the 4-color condition for the stock refund (though it’s technically possible), but the base profile is still quite nice. It’s important to have access to a bouncer, I think, to give you some ability to deal with stuff like tap counters and neg-soul walls; and if you don’t think it’ll be relevant in the matchup, it can potentially be clocked or levelled for yellow. A 1-of, as a tech card.
Level 1
Level 1 combo:
Naturally a 4-of, as the card that you’d ideally like to be trifielding every turn of level 1 and level 2. It’s got an interesting combination of good and bad aspects, but overall I think it’s quite a good level 1 combo.
The biggest thing about this combo is probably that there’s a chance to get both hand and stock; this is something that we’ve been seeing a decent amount of recently, but it’s still quite notable. This combo doesn’t require a reverse or any sort of significant condition for the combo itself to work (indeed, it doesn’t even have the common sort of non-condition you often see on level 1 combos, instead just taking an additional 500 power off the base power of the card), but the condition to get stock is relatively steep: you need to not just mill a total level of 3 over two cards, but then actually salvage a level 3 (which may well just be a brick next turn). Meanwhile, the hand you get is somewhat selective but not the most selective: you’re guaranteed to be able to get any level 0 in your waiting room, assuming you don’t refresh, and you have a decent but not great chance of being able to get a higher-level card.
This combo also includes a mandatory mill 2, which can be good or bad depending on your deckstate. One awkward factor here is that you don’t necessarily know how many cards you’ll end up milling during the attack phase: if you hit a level 3 on the combo or trigger a bag, you can blind stock, which mills an extra card, but you don’t know how much of either of those will happen. Both of those blind stocks are optional, which means you can avoid that extra milling if you want, but often that’s not worth giving up a free stock. So it’s not unusual to end up refreshing during your attack phase; I suspect it’s generally safer to mill too much than too little. But that can also cause some trouble with the combo, since it needs a waiting room to salvage from. If you do end up triggering in a new deck, though, it’s at least nice that bag still gets you stock without a waiting room.
The powerline for this combo is a fairly extreme example of the “big on your turn, small on the opponent’s” type: it swings at 8k with the climax, relatively large for a level 1 combo, but defends at a paltry 2k, meaning that the opponent can often take it out even with utility 0s. I’d prefer if it sat a bit bigger on the opponent’s turn, to be able to take advantage of the cases where they’re not able to field 3 level 1s or somewhat big level 0s, but this is probably still better than if the on-turn power was particularly small.
Pseudo-encore event counter:

This is a 4-of, with the idea being that you use it to loop the level 1 combo. If you have triple combo, you can get at most 1 combo back off of the combo itself, and so you need some other way to loop it. While you can’t get this event from the combo, you can get it from the brainstorm, or of course from just drawing it naturally.
There’s also a draw-drop stapled to this event. This can potentially help you filter out extra level 3s that you got off the combo in order to get free stock (or less useful level 0s that you got because there weren’t any better options, or extra climaxes, or whatever). It can also be nice if you have 1 card left in deck and know it’s clean, or give you some leeway to leave a deck of 2 or 3 cards without feeling too bad if they’re all clean, which can help with the issue mentioned above of not knowing how many blind stocks you’ll get going into your attack phase (though speaking of blind stocks, the fact that they’re blind can be awkward, since you don’t necessarily know whether you need to mill with the event or not). The draw-drop is mandatory, but if you’re about to refresh and you know or suspect that you have a climax left, you can potentially wait for a later attack to play the event. You don’t have to choose a character in battle to give the ability to, so it often doesn’t matter which attack you play it on, though of course the opponent does need to front for you to have a counter step, so if you have a character that you don’t care about surviving (like a utility card you attacked with last turn), and the opponent attacks that last, you probably don’t want to wait until that attack, in case they side it.
On your finishing turn, you can use this card during your main phase to give a brainstorm (or other card on stage) the free pseudo-encore ability, in lieu of playing an additional character to sac for the finisher’s heal, which makes it sort of a free draw/drop. Or just in general, you can use this during your main phase if you feel that the draw/drop is worth spending a hand on (or if you’d go over hand limit anyway).
This is a pretty good card to level for green; it’s most useful at level 1 or early level 2, so if it ends up in your clock, there’s a good chance you wouldn’t see it again until it’s not especially useful anyway. Though there is some potential to use it to save your level 3 combo, I suppose, if you fail to kill and then your opponent also fails to kill you on the swingback.
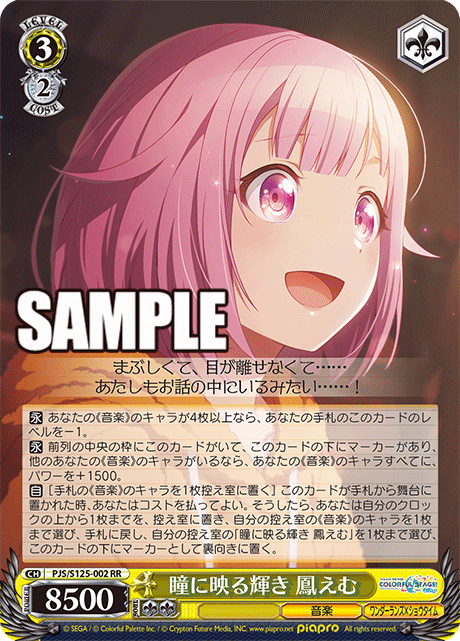
Memory condition:

You need to get this into memory for the finisher to work. As far as memory conditions go, it’s not the worst — you only need one of it, and it does something somewhat useful — but it’s not great, either. I don’t run the level 0 Haruka that enables the assist ability, but that’s not much of a loss. Sending this card to memory costs a stock, which is a bit annoying, but can also be nice if you need to pay out stock in the midgame. It’s a decent card to play if you need to mill while uncompressed, and to some extent if you want a controlled amount of mill, though the fact that it can only grab «MORE MORE JUMP!» characters means that it can sometimes be difficult to only mill 1 or 2 cards. And of course, it’s distinctly possible for it to whiff completely, though it’s not especially likely (this deck has 20 «MORE MORE JUMP!» characters including this card itself). Though sometimes, you have enough hand that you’re fine if it whiffs anyway.
A 2-of since it’s easy enough to find one of them over the course of the game (particularly since you can often grab it off the combo if necessary). I could see bumping it up to 3 just because I sometimes find myself levelling one of them, but I doubt it’d be worth the slot. I wouldn’t cut it down to 1, though, since at that point there’s too much of a risk of it just not being accessible, or at least you’d need to pay a lot more attention to finding it. As a 2-of, it’s pretty easy to just ignore it until level 2 or so.
Antichange backup:

A level 1 antichange is always nice to be able to threaten, and even more so when it’s hard removal. Depending on how the game goes, the ditch 2 cost could be anywhere from prohibitively steep to almost unnoticeable (or in some cases, it could even be helpful, if your hand is flooded with climaxes). But at any rate, it’s good to have the option, particularly since there’s a reasonable chance of being able to grab it off the level 1 combo (or the early play). And if the opponent just sides your level 1 combo, you’re probably fine with that too. It would be nice if it was a different color, but that’s not a big deal.
Level 0
Brainstorm:
In many ways, the core of the deck; a 4-of since you ideally want 2 of them in the back row. There’s an argument for running a more selective brainstorm alongside it, but I like the reliability of a double 5-card brainstorm. It’s honestly not too hard for one of them to whiff, but both whiffing is pretty rare (which isn’t to say that it never happens, of course). The fact that the deck can generate extra stock but doesn’t necessarily need a lot for the finisher makes it pretty easy to brainstorm quite a bit, but on the other hand you often don’t want to mill that much (or perhaps you already have enough hand).
Climax swaps:


While the brainstorm is pretty good at finding a climax, it’s not necessarily good at finding the right climax. So I’m running 2 climax swaps, one each of two different types. Both swap from the waiting room, since the brainstorm can potentially find climaxes in the deck (or mill them into the waiting room), but they have different costs. Sometimes you have extra stock, and sometimes you have extra hand (or characters on stage); you don’t always have the ability to choose which climax swap to use, but when you do, it’s nice to have options. And while I generally gravitate towards sac climax swaps, the stock-costed one has the «MORE MORE JUMP!» trait and is in a relevant color.
On-death ruijerd:

If you find yourself wanting to go for the finisher while at low 3, it can be very nice to have a card that lets you clock yourself without paying stock; it becomes essentially a hand for a stock (or if you needed to play a card to sac anyway, just a free stock). This card is quite nice for that because it gives you selection at the same time, which this deck doesn’t have a ton of. (You can also use it for selection on the finishing turn even if you don’t need to clock yourself, if it comes down to it.)
In addition, this card is a good attacker at level 0, generally swinging at 4k and giving you selection at that point as well; and it’s useful both going first and going second. Being a costless clock option can also help you clock up to level 1 if necessary.
This is also the primary source of blue in the deck.
A 3-of since you want to see it early but don’t necessarily want to see 2 of them. Honestly, 2 of them could be pretty decent, at least going second, but it’s not ideal since they don’t directly plus you, and depending on what your hand looks like, you might not have a second card you want to clock.
Riki:
You could argue that the riki conflicts with the ruijerd, since both involve clocking yourself to search, but it’s often nice to use both; you want 3 of your level 1 combo, after all. And even if you have both but only want to use one, you can at least choose whether to spend stock or hand.
As usual, this is a 3-of; like the ruijerd, you want to see it early but don’t benefit too much from seeing two. (Though it can be nice to have a second in the waiting room to put into clock so you can potentially level it later.)
Shinobu:

While this card can be nice as a plussing 0, it’s perhaps more useful as a way to loop the level 1 combo. It’s nice that it can work from either the front or the back row (though of course it’s more efficient to use it from the front row), meaning that it can be used alongside either a double brainstorm back row or a triple combo front row. It’s also just a bit more green and «MORE MORE JUMP!» trait.
A 3-of since you want to see it early on, but it’s not one of the primary level 0 attackers. This count is pretty flexible, though; both bumping it up to 4 and cutting it down to 2 seem reasonable to me.
Cleancuts:
In contrast with the shinobu, these are primarily included as plussing 0s, though they can also be used to loop the level 1 combo, at least if you haven’t already played down the second brainstorm. (And one nice thing about bag trigger is that you don’t have to worry about triggers putting you over the hand limit, so you don’t need to commit a brainstorm that you’re not going to use just in case that happens.)
This deck has a decent amount of reasonably good cleancut targets. The ideal one, of course, is the brainstorm; it’s only 500 power, but that shouldn’t matter on turn 1 going second, at least. The helmet is also a decent target, as is the shinobu (though that one’s a bit awkward because it’ll only attack at 1k on the following turn, or 2k with a climax).
I have a 2-1 split between the Saki and the Kanade mostly for color; yellow is more important, since you’d like to have it at level 2 for the early play, but the deck has a bit more of it already. The Kanade also works a bit better for looping the level 1 combo, since it can give the cleancut ability to one of the combos, which swings a lot bigger than either of these level 0s, and it also allows for the possibility of triple combo + cleancut (though that likely means you’re playing over the Kanade herself). The Saki is generally better for cleancutting at level 0, since it swings bigger, but if you happen to open the Kanade alongside the ruijerd (and another level 0 that you can play first), you can make a 4k cleancut.
The overall count of 3 cleancuts is because they’re an opener but not the only one, and there’s not a ton of benefit to seeing multiple of them or seeing them later on in the game (though they certainly can be useful later on in some cases).
Helmet:


This is perhaps the primary source of main-phase selection in the deck, as well as a generally good level 0 to grab off the level 1 combo if you already have your brainstorms (or they’re not available). I’m running the promo that has the «MORE MORE JUMP!» trait, but if you don’t have that, running the «Leo/need» one is still fine.
A 2-of because you do generally want to see it at some point or have it available to grab off the combo, but you don’t especially need to draw it early. You also don’t necessarily want to play it too often, because it does cost hand.
Cards Not Included
2/0 combo:

While I mentioned in my initial post that I was thinking I’d include the level 2 Shizuku combo, I ended up feeling like the deck doesn’t really have the selection to support a split like that, and it’s better to focus on looping the level 1 combo. Looking to salvage level 2s off of the level 1 combo also meant that I tended not to benefit from the extra stock aspect as much.
Freefresh backup:

While this could potentially be a nice way to insure against triggering & milling too many climaxes when you’re ending with a decent number of cards in deck, the condition of 5 bags in waiting room can be kind of awkward, for example if there are a few in clock or stock, but you still have, say, 3 or 4 in waiting room that you’d like to get back into the deck. (It’s fine if there’s one as the top card of stock, since that’ll get paid out when you play the backup, but the second card in stock doesn’t count towards that 5, even though it’ll get paid out if you are able to do the freefresh.)
Also, being a level 2, you could easily just not be able to grab this off the combo (particularly if you’re milling climaxes, which is when you most want it), and if you are able to get it, you likely could get a level 3 and an extra stock instead. This backup made a bit more sense when I was running the level 2 combo, which also makes it harder for the opponent to side and still do damage, but even there it has the issue of not helping if you have too many climaxes in stock.
«MORE MORE JUMP!» stockshuffle:


There’s an argument for using the Shizuku stockshuffle with the «MORE MORE JUMP!» trait, but I think the potential to early-play the Shiho one is more important. This deck has enough «MORE MORE JUMP!» characters that one more doesn’t feel essential. But if you feel like you need more, this is an easy one to add.
Fumio:
As mentioned above, this was replaced by the on-play moca that can also mill 25. It’s possible that I’ll end up swapping back to the fumio — that mill 25 is quite expensive, after all — but it’s rare enough that a fumio is necessary to begin with (particularly when stockshuffle is also an option).
Level 0 Airi:

This card could be nice as a guaranteed way to grab a level 0 or the level 1 combo (or potentially a higher-level card) out of the waiting room, while still leaving a body on stage to attack with or sac (unlike the helmet). But I feel like it’s mostly competing for the helmet’s slot, and I’d prefer to be guaranteed to be able to grab a level 3. And it’s mostly only useful as an attacker at level 0, where it’s got the least selection (though there is something to be said for being able to mulligan more aggressively if you open it). Perhaps it could take the shinobu’s spot as a level 0 «MORE MORE JUMP!» character that can help loop the level 1 combo while potentially (but not necessarily) serving as a third attacker, but it doesn’t plus you in the same way, and I feel like a lot of the time hand is more valuable than stock in this deck.
Delayed search/salvage through memory:


There are a couple cards that can ditch a card to send a character to memory, which then goes to your hand next turn. These could be used to get the memory condition without spending a stock, but since you often don’t expect to attack with it or have a next turn, you’re effectively spending a hand or two by doing it that way (depending on whether or not you need a sac target anyway), and you also need to make sure the memory condition is in the right zone on that specific turn, rather than being able to set it up ahead of time.
These also provide some selection, but they have much the same issue as the level 0 Airi above of mostly being worse than the helmet for that (and in the case of the search version, which is limited to cards with the Memory keyword, the only cards it can select into are the finisher and the memory condition).
Level 0 Minori:

I guess you could call this an “aqua ruijerd”? This level 0 could be nice as a way to get clock on the finishing turn without losing hand, while also being a reasonable opener and way to clock up costlessly. But it whiffs on events, and it seems quite bad if you don’t get 2 hand back from it (at that point you’re clocking yourself just to turn one card into a random other character, or you could even lose a hand altogether). Overall, I’d prefer the on-death ruijerd.
Bag salvager:

This card can guarantee a climax, but 2 stock is often a pretty hefty cost even for this deck. The fact that it’s on-death also means that you’re probably playing over it a lot of the time; that’s a relatively minor downside, though, since it’s most likely to be used to grab the finisher climax anyway, in which case it could serve as a sac target for the finisher. Ultimately, this deck just doesn’t have that much trouble finding its finisher climax; while you can certainly find yourself in a situation where a card like this would be necessary, I don’t think that’s common enough for it to be worth the slot.
Level 0 Haruka:

This is the memory condition for the memory condition — that is, the card that turns on the assist ability for the level 1 Haruka. I’m not sure if that assist ability would come up much regardless; the window for it is pretty much only at level 1 before playing the second brainstorm, and even then only if you don’t have something else filling up the back row (like a riki or a shinobu that you’re not attacking with this turn) and you’re not looking to cleancut.
This card itself isn’t a bad attacker at level 0, but it’s also not great; it doesn’t plus, and it doesn’t have the best selection. It can help with deckspeed, which is nice, but it only mills 2 more cards than the shinobu, and in general deckspeed isn’t something that this deck struggles heavily with.
On-stage:

I didn’t think about including this card until right before posting this, but it might be a nice option if you don’t want to have a double brainstorm backrow; in particular, it’s a way to pay out stock that doesn’t mill you, and it’s potentially more reliable than the combo at getting level 3s (or alternatively, you can use it to grab a playable if you filled up your hand with level 3s in order to get extra stock). The other ability is sadly completely useless in this deck, but it’s at least kind of nice that the card is blue. Overall, though, I suspect I’d prefer the second brainstorm.
Conclusion
Has giving bag good combos ushered in a reign of terror from the best trigger? Well… probably not. But I do think this is a reasonably good deck, and that’s not despite the bag triggers but in part because of them. Still, if you’re afraid of blind stock, this isn’t the deck for you; I can’t deny that there will be games where you don’t realize until the next deck that you’ve got a climax buried irretrievably deep, whether from a bag trigger or from the level 1 combo. But there will also be games where a blind stock lets you EP when you otherwise wouldn’t, or gives you an extra brainstorm that ends up hitting 2 climaxes. On some level, this deck requires you to gamble, on not losing too many climaxes to blind stocks (or to attack-phase mills), on milling 3s off the level 1 combo, on hitting brainstorms, on sticking 4s on the finishing turn. Of course, the brainstorms check 5 cards and the burn 4s only check 3; and if you find that you blind stocked a climax last turn, you may well be able to pay it out and then mill through to the next deck. So while you may be gambling, the odds often aren’t bad.
At its core, this deck is a standard 1k1 deck, looping a level 1 combo into a finisher at level 3. But within that category of 1k1 decks, I’d say there are 3 main focuses: rushing (early game), compression/healing (midgame), and finishing (late-game). These exist for all decks to some extent, but different decks often focus more on one or another. For this deck, its greatest focus is pretty clearly on the finisher. It’s got a low soul trigger count and nothing in the way of extra soul early on, so it’s not great at rushing, though it does at least have a decent amount of support for trifielding at level 0 and playing climaxes starting at level 1. The blind stock and largely uncontrolled attack-phase milling (and the lack of trigger control) keep it from being able to lean too much into building and maintaining compression, though that is something of an option in good games where you end up with a base of clean stock. Meanwhile, it has a reasonably powerful finisher with a lot of reach, some potential to add on additional finishing power, and the ability to deal with the opponent’s compression (though it’s not as good at dealing with defensive counters — but not helpless against them, either). Somewhat unusually for a finisher-focused deck, the fact that the finisher is more expensive when you don’t have clock can push it towards healing down at level 2 rather than clocking up for a finish. It certainly can clock up if necessary, though, particularly in a situation where the opponent is already uncompressed and thus there’s no need to spend resources (and sculpting) on decompression.
I’m not sure if I’d claim that this deck is the best that Project Sekai can make, but I do think it’s one of the better options, being generally solid with quite a scary topend. And at the end of the day, I’m just glad that bag got some good combos.

Leave a comment