Following up on my initial Kaiju No. 8 post, the first thing I wanted to try out was the choice topend. I was curious whether going for 2-soul climaxes with no level 1 combo would actually work… and so far, it seems like it does. In the tests I’ve done, it’s been pretty consistent about getting the combo off, and it’s generally been milling into a deck averaging slightly more than a soul trigger per card.
Table of Contents
- Deck List
- Overview
- Level 0 and Level 1 Cards
- Level 2 and Level 3 Cards
- Cards Not Included
- Closing Thoughts
Deck List
Deck Log: 2JYKU
EncoreDecks: rlohmwC-W
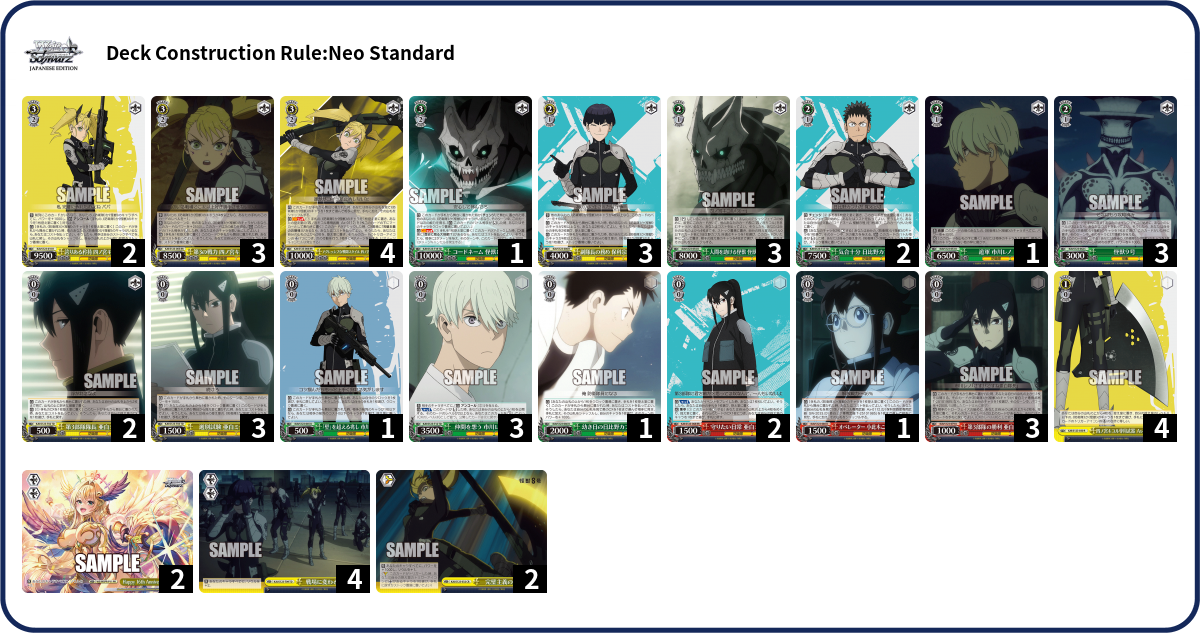
(Note that English doesn’t currently have a generic yellow 2-soul, so if this set is released in English, this deck might need to use green 2-souls instead. That’s not a big deal, though.)
The deck name, “Palace of Burn 4s”, is based on Kikoru’s family name 四ノ宮 (Shinomiya), which could be read as “Palace of 4”. (I don’t know if any Japanese speakers would naturally read it that way, but that’s beside the point.)
Overview
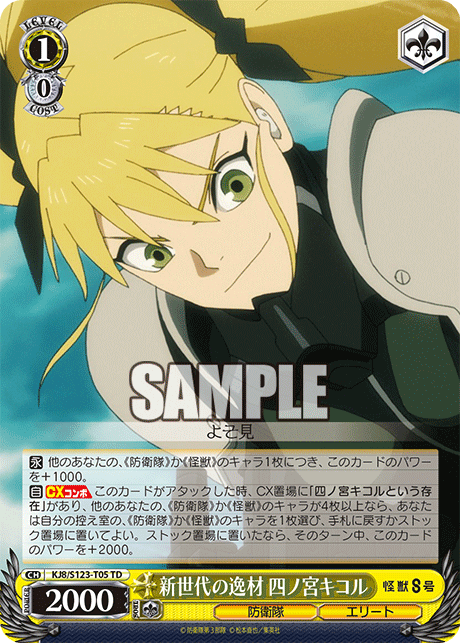
This deck is very much built around the level 3 Kikoru choice finisher:

The goal of the deck is basically just to reach level 3 with the 7 stock and 4 hand necessary for triple combo, while maximizing the proportion of soul icons in the current deck.
Since the combo counts the number of soul icons milled, rather than just the number of cards with soul icons, my goal was to include double soul triggers to attempt to get more than two burn 4s per combo (or at least to make up for any non-soul-triggers milled). I went for six 2-souls and two of the finisher climax; you could potentially go further, with only a single copy of the choice, but that seems unnecessarily risky to me.
In lieu of having a plussing climax combo, the deck leans into a couple level 0 characters that plus by checking for level 2 or higher cards.


This of course means that the deck needs to have a reasonably high ratio of level 2 or higher cards, which is fairly difficult when the event required to make the finisher work is level 1. I ended up with only 22 of them: less than half of the deck, but not by much. The Mina, milling 2 cards, still has a 70.2% chance of hitting, which feels good enough to me, even if I’d prefer for it to be higher.
Finisher Calculations
(I’m using this excellent damage probability calculator for these.)
It’s hard to get a good idea of how much damage to expect from this finisher, both because the number of burns is variable, and because the burns themselves are for 4, which is inherently high-variance. To try to simplify it a bit, I’ll assume that the attacks are all for 4, so it’s just varying numbers of instances of 4.
First off, here’s how triple combo looks into some default deckstates. I arbitrarily set op_unused to 0 cx / 15 ds, meaning that there are a total of 8 climaxes in 35 cards in rotation (with any not in the deck being in the waiting room).
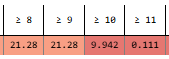
7 burn 4s (10 total instances):

6 burn 4s:

5 burn 4s:

4 burn 4s:

Unsurprisingly, the opponent’s compression has a large effect on how much damage you deal; that’s especially apparent when looking at the chance of dealing 9-12 damage with 6 or 7 burn 4s, where 8 in 20 compression versus 6 in 30 compression makes it swing between almost impossible and practically guaranteed.
Stockshuffle
This set has a stockshuffle, so naturally you’ll tend to want to use that to decompress the opponent. One thing we can investigate with these damage charts is whether or not it’s worth it to stockshuffle in a given position if it replaces a combo.
For example, if you assume that each combo hits 2 soul triggers, you can compare 6 burn 4s into 8 in 25 (triple combo) to 4 burn 4s into 8 in 30 (double combo + stockshuffle); this represents the situation of 5 clean stock shuffled in (you can just look at the total count of deck + stock, since the blindstocks don’t affect the overall compression). It seems like the stockshuffle is generally a bit better here.
Or if you compare 6 burn 4s into 6 in 20 (triple combo) to 4 burn 4s into 8 in 30 (double combo + stockshuffle), that corresponds to a case where the opponent has 2 climaxes in 10 stock; in that case it doesn’t seem worth it, at least if the opponent has a relatively uncompressed waiting room.
Though I suppose the compression of the waiting room is actually a fairly significant limitation of this approach: once you start looking at fewer than 8 climaxes, there’s a pretty good chance that triple combo will go through refresh and start putting 4s into the next deck. The charts above have 15 cards not in rotation, so for a deck of 8 in 30, that means that the waiting room is 5 clean cards. So really, if we’re thinking of that as a post-stockshuffle deck, then the pre-stockshuffle deck should have the same 5 clean cards in the waiting room.
6 burn 4s into 6 in 20 deck with 0 in 5 waiting room:

It still doesn’t seem worth it to stockshuffle in this case, but the numbers are a bit closer. And with the refresh in the picture, it starts mattering that we’re looking at the full 8 in 30 deck rather than just 20 cards of it for the “post-stockshuffle” calculation; in reality, the stockshuffle is likely a bit better than that calculation suggests, because some amount of the time a burn 4 will make it into the next deck, with 5 more clean cards.
Another approach to calculating the effect of a stockshuffle is to run a calculation for each possible result of the stockshuffle (that is, each different way that the climaxes could be distributed between deck and stock), then combine those results, weighted by the chance of that climax configuration. Whereas the previous approach of just combining deck and stock worked best with large decks with lots of climaxes (so you’re less likely to see a refresh), this approach works best with low numbers of climaxes, so there are fewer different possible results of the stockshuffle.
For example, a very simple situation would be if the opponent was 1 in 4 with 4 clean stock. (Having only 4 cards in deck means we don’t need to worry about them levelling up before refresh.) In that case, a stockshuffle would simply be a coinflip, a 50% chance of moving the climax to stock and a 50% chance of doing nothing. I doubt that’s worth giving up a combo, but let’s see. I’ll give them a compressed waiting room, 7 in 21 (so before stockshuffle, the deck + waiting room would be 8 in 25).
6 burn 4s:

4 burn 4s, stockshuffle removed climax:

4 burn 4s, stockshuffle didn’t remove climax:

One nice thing about everything being 4s here in this simplified scenario is that it limits the number of different probabilities we have to deal with, since there’s a hard cutoff at multiples of 4 (plus 1 for the refresh penalty). The most interesting damage numbers are the 6-9 range and the 10-13 range, so I’ll just look at those. (I suppose there’s a slight chance of a second refresh penalty, hence the higher numbers for 6 and 10 in some cases, so really I’ll focus on 7-9 and 11-13.)
For dealing 6-9 damage with stockshuffle + double combo, there’s a 50% chance that it’s a 78.83% chance, and a 50% chance that it’s a 30.33% chance. So 50% * 78.83% + 50% * 30.33% = 54.58%
And for dealing 11-13 damage, that’s 50% * 20.90% + 50% * 2.498% = 11.70%
So it turns out that I was wrong here, and it actually is worth it in this case (unless you need to do exactly 6 damage, I suppose). I guess the waiting room is compressed enough that getting two extra burn 4s isn’t quite as good as a 50% chance to guarantee the first burn 4. (Of course, it’s not guaranteed that it’d be two extra burn 4s; that third combo may be worth more or less depending on the concentation of soul triggers in your deck.)
Ultimately, I’m not sure how much this all helps in terms of getting an idea of when it’s worth it to stockshuffle instead of going for triple combo, and when it isn’t, since of course there are a huge number of possible situations you could find yourself in.
One way to reduce the number of variables you have to think about is to just compare the compression of the opponent’s deck + waiting room to that of their deck + waiting room + stock (to the extent that you know those, of course), and see if adding the stock makes it overall less compressed. That’s not exactly what the stockshuffle does, of course, but so long as their waiting room isn’t significantly more compressed than their deck, it’s probably not too far off.
One Card in Deck: Shuffle Back 4
Another thing I want to explore is when it’s worth it to shuffle back 4 characters at the cost of an attack with this card:

In particular, I’m concerned with the case where the opponent leaves 1 card in deck. This is unfortunately a case where we run into a limitation of the calculator; I believe it doesn’t have any handling for the opponent levelling up and putting 6 clean cards into their waiting room, which I suspect is a significant benefit of shuffling back 4 cards before you burn 4. However, we can work around that to some extent.
Non-Climax
To start with, let’s limit it to the case where that 1 card in deck is clean. If you just go for triple combo, they’ll level up at some point after refresh, so it won’t matter unless they refresh a second time; I’ll focus on cases where all 8 climaxes are in waiting room to avoid having to worry too much about that, so this case should be handled just fine. On the other hand, if you shuffle back 4 clean, then we know that the first 4 will stick. If we assume that the opponent is somewhere from 2-3 to 2-6, then they’ll level up and once again be at 1 card in deck. So for this case, I’ll reduce the number of 4s by 1, add 2 clean cards to the waiting room (since 4 got shuffled into the deck and then 6 got put into the waiting room from levelling up), and then have it deal 4 guaranteed damage at the end to make the numbers line up with the other case.
I’ll look at 4 possibilities here: 8 or 9 instances of 4 for the triple combo option, and 4 or 5 instances of 4 (plus a guaranteed 4) for the shuffleback option. That is, for each option I’ll consider the case where you hit the same number of soul icons as cards milled, and the case where you hit one less.
(Since we’re assuming that the opponent is between 2-3 and 2-6, we want to focus on the chances of doing 8-11 damage.)
Scenario 1: Opponent’s waiting room is 8 in 19
Triple with 6 burn 4s:

Shuffleback with 4 burn 4s:

Triple with 5 burn 4s:

Shuffleback with 3 burn 4s:

Scenario 2: Opponent’s waiting room is 8 in 24
Triple with 6 burn 4s:

Shuffleback with 4 burn 4s:

Triple with 5 burn 4s:

Shuffleback with 3 burn 4s:

Scenario 3: Opponent’s waiting room is 8 in 29
Triple with 6 burn 4s:

Shuffleback with 4 burn 4s:

Triple with 5 burn 4s:

Shuffleback with 3 burn 4s:

I’m a bit surprised to see that even for the 8 in 29 case, the shuffleback is slightly better; I suppose it’s basically a matter of replacing 4 instances of 4 with a single guaranteed 4. At that compression, 4 instances of 4 still has a slightly higher expected damage, but the extra bit of decompression from the level-up makes up for that. (Though like with the stockshuffle, it’s not necessarily removing 3 instances of 4; how much that extra combo is worth depends on the concentration of soul triggers in your deck.)
Climax
OK, so that was the case where there’s 1 card in deck and it’s not a climax; what about the case where it is? This would be straightforward, except for the possibility (if you shuffleback) that the first 4 still goes through, once again putting the clock into refresh. I suppose we can run two separate calculations and then add them together. If the first 4 goes through, then we can do the same thing as before where we start from after that 4 went through and then add 4 damage on at the end; we’ll just need to divide those probabilities by 5, since there’s a 20% chance that this happens. For the case where the first 4 cancels, we can run the calculations against a deck that’s 1 in 5, but start off by checking if there’s a climax in the top 4 cards, and only do the burns if that’s the case. That should give us the probability that the first attack cancels and a given amount of damage is dealt, which can then be added to the probability that the first attack goes through and that same amount of damage is dealt. We’re already focusing on the 8-11 damage range, so we only have to do these calculations for those numbers.
So let’s try this with the 8 in 25 scenario (which in this case will be 1 climax as the 1 card in deck and 7 in 24 in the waiting room), with 4 burn 4s.
If the first 4 sticks:
If the first 4 cancels:

Once again, everything being 4s means a lot of probabilities are the same, so we only really have to worry about 2 different numbers here.
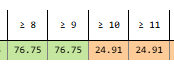
So for 8 or 9 damage, we have a 76.75% chance if the first 4 sticks; dividing that by 5 gives us 15.35%. Adding the 24.11% chance if the first 4 cancels, the overall probability is 39.46%.
Then for 10 or 11 damage, it’s 24.91% / 5 + 1.838% = 6.82%.
Compared to triple combo with 6 burn 4s:
So in this case, just going for triple is better; that’s not too surprising, I suppose, since you don’t get the same guaranteed 4 from the shuffleback.
How about the 8 in 20 scenario (7 in 19 in waiting room)? That one was rough for triple combo, but maybe the shuffleback can help the second 4 stick even if the first cancels?
Shuffleback if the first 4 sticks:

If the first 4 cancels:
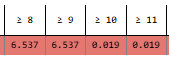
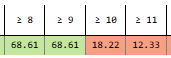
8 or 9 damage: 58.17% / 5 + 6.537% = 18.17%
10 or 11 damage: 8.607% / 5 + 0.019% = 1.74%
Triple combo:
So even this only seems to be worth it if you actually need to do 11 damage, and it doesn’t exactly bring that out of the realm of a hail mary.
Of course, the other option for dealing with 1 card in deck that you know or suspect is a climax is to use the stockshuffle; depending how much stock the opponent has and how clean it is, that may or may not give you a good chance of changing the scenario to 1 clean card in deck. Notably, stockshuffle + shuffleback + double combo costs the same amount of stock as triple combo, just 2 more hand (though it also doesn’t require the 3rd event in waiting room, which you might have needed to spend a hand to set up anyway).
No Level-Up
These have all been assuming that a successful first burn 4 will get the opponent’s clock into refresh, but let’s also take a look at the case where that doesn’t happen. This is a lot simpler, since we can just use the calculator directly, ignoring any potential decompression from the opponent levelling up. Without any potential decompression, there’s also no need to treat it differently depending on whether or not that one card in deck is a climax; those are just different deckstates (1 / 1 versus 0 / 1), which the calculator can handle just fine.
Let’s start by looking at the relatively extreme 8 in 20 case (i.e., waiting room is 7 or 8 in 19).
Triple combo, 6 burn 4s:

Shuffleback, 4 burn 4s:

Even in this case, it mostly doesn’t seem worth it to use the shuffleback unless it’s a guaranteed win; I suppose it’s slightly better at killing from 3-0 if the 1 card in deck is clean, but that might be an artifact of the assumption of single soul triggers on the attacks; swings for 3 or 5 might give you a better chance of sticking 7, and even more so if you have the option to side. So my suspicion is that the shuffleback generally isn’t worth it if the opponent is already at level 3.
Level 0 and Level 1 Cards
Getting back to deckbuilding, the main question here is how to use the limited number of non-level-2 cards, so I’ll start with those.
First off, of course, is the event that the finisher needs to marker.

This is a 4-of, to maximize the chance that there are 3 of them available in the waiting room on the finishing turn. You could potentially only run 3 of them, since there are ways to pull them out of deck or clock, but that’s a bit too risky for me, particularly since you might need to spend those resources or sculpting efforts on other stuff.
This card is also quite nice in its own right; at level 1, it provides deckspeed and selection; and even later on, given the number of soul icons in the deck, it can select into level 2 or 3 cards fairly often.
The waiting-room access complements the finisher’s search ability pretty well on the finishing turn, but the fact that the mill is mandatory can be awkward. If you refresh, then you no longer have any of the events in the waiting room, so the combo no longer works; combined with the fact that the finisher itself mills, that means that you need to leave at least 7 cards in your deck going into your attack phase. You also can’t ditch the event for the cost of one copy of the finisher to set up for the next one, since it has to ditch a character. So while it can be nice to hold onto one copy of the event for the finishing turn, you need to be careful about holding onto too many.
Next, there are the plussing level 0s.
The red Mina has the most efficent plussing, with about a 70% chance of coming back for free, while also providing a bit of deckspeed, but it does leave an open lane, and it also needs to survive to the opponent’s turn.
The Reno is already a decently sized body at level 0, and has a chance of surviving even if it crashes or ties, but it’s slightly unfavored to hit, and can be denied by hard removal.
And then there’s the salvage riki, which is guaranteed, but costs stock & clock. The on-death part can also be denied by hard removal.

I went for 3 of each of these, to have a decent chance of seeing them all while still somewhat limiting the number of level 0 cards in the deck. These are also the cards you aim to level, so it’s kind of convenient that they’re each a different color (though I ended up not running anything that needs red). I’d say that the red Mina is a bit more important than the Reno, given its greater chance of plussing, so I could see a 4-2 split of those, but the Reno is nice for killing the opponent’s characters (particularly when the Mina’s topcheck whiffs), and as a source of green. And depending on the situation, it can potentially survive at level 0 without even needing the top check.
The Reno uses the new once-per-turn keyword, which has the effect of making it optional to reveal the top card of your deck. This means that if your opponent hard-removes it (or if you just don’t care to keep it around), you don’t have to give them that extra bit of information.
When you’re not able to get over the opponent’s characters — unfortunately pretty common once they reach level 1 — it can still be fairly reasonable to side, given the high count of soul triggers in the deck. That’s especially true if you also play down a 2-soul climax, of course.
The riki is very nice as a failsafe; in particular, it can salvage itself back when it dies and then salvage another plussing 0 on play, letting you get potentially a full turn’s worth of attacks out of it. Of course, you don’t want to do that too often, since you do need to build up stock and you don’t want to get too far behind in damage, but it can help you recover from the other plussing 0s whiffing, or let you comfortably slam a 2-soul if the opponent seems uncompressed.
And in general, being able to salvage back the other plussing 0s with the riki (or the event) just gives you more chances for them to hit; the more of them you play, the more likely you are to get at least a few free plusses. You don’t need them to hit every time, just enough to let you build up a bit of stock and continue attacking through the midgame.
Since the riki can salvage any on-trait character, it can also be used for waiting-room access on the finishing turn if necessary (assuming that you can afford to clock yourself, of course). It’s also nice that if you need to clock up to level 3, you can potentially salvage your finisher while doing so.
There are a few tech cards that I run as one-ofs; they’re important to have as options on the finishing turn, but not as important to see early. These provide access to the finisher climax and/or the events when they’re stuck in deck or clock.
Kafka provides access to the choice if it’s in deck (or can search out a 2-soul that you can then swap into the choice).

Similarly, Konomi can search out the event from the deck; this can be important on the finishing turn, but can also be nice early on, to filter out high-level characters or get more deckspeed.

And Reno can grab the choice, the event, or anything else out of clock (while incidentally being a nice card to open turn 1 going second).

The finisher having a search on play means that these are fairly accessible even as 1-ofs, particularly in combination with the event being able to grab them from the waiting room.
Notably, if there are multiple events stuck in your deck, you can search one out with the Konomi, play over that with something else, and use the event to get the Konomi back to search out another event. You’re spending a hand to do this, of course — two if you play over the Konomi with something that you wouldn’t otherwise have played — but the finisher is pretty hand-light anyway.
And even if you already have 3 events in your waiting room, you can use the Konomi just to search the 4th one out of your deck, to remove a whiff on the finisher. Similarly, the Kafka can search out the 2nd choice (assuming you can afford to clock yourself, of course).
When searching out events, you do need to be careful about how many cards are left in your deck, because this deck doesn’t have many ways to get the event out of your hand without milling. It doesn’t help to have 3 events in your waiting room if you’re going to refresh before the third attack, after all. In that situation, it may be better to just leave the event in the deck, since there’s a chance of milling it out in the first 2 combos (you may lose out on a burn 4, since the event doesn’t have a soul trigger, but hopefully getting 3 combos rather than 2 makes up for that). Even better is if you trigger it on the first attack, since then you pay it out with the second combo; that doesn’t work if you trigger it on the second attack, though, since you have to have the event in waiting room in order to pay the cost to begin with.
The set only has one generic selective tap-self brainstorm, so that’s an easy choice.

This is a 2-of, since you’d like to see it fairly early but don’t need it immediately. There’s also some potential to have a double brainstorm backrow, though I don’t think the deck generates quite enough stock for that. If there was more selection among the level 2 or higher characters with soul triggers, I might consider not having a brainstorm at all, but there’s not much.
This brainstorm also lets you draw/drop when you play an event (with the new once-per-turn keyword, so it doesn’t have to be the first time). That can be useful, since you do naturally end up playing the 1/0 event; in particular, it’s one of the few ways this deck has to ditch extra climaxes. Along the same lines, it can be used to get 2 of the event into your waiting room on your finishing turn while only milling 5 cards.
Finally, there’s the climax swap, which notably has a soul trigger.

Since I want a high count of level 2 or higher cards in addition to a high count of soul triggers, I’m not jamming 4 of this card just because it’s a level 0 with a soul trigger; that does make me feel comfortable running 2 of it, though. With the finisher climax at 2, making sure you have access to a climax swap can be important (though some amount of the time you just search the choice out directly anyway).
Level 2 and Level 3 Cards
The finisher itself is a 4-of, of course, since you ideally want to field triple.
The fact that it searches helps this deck out a lot, reducing the amount of selection and/or hand that you need leading up to the finishing turn. You do want to sculpt into multiple of them, ideally; that’s more reliable than hoping that additional copies are in deck on your finishing turn, of course, and generally makes the finishing turn more flexible, but on top of that, if there’s nothing that you specifically need, you can use that search to remove a character without a soul trigger from your deck. (And you can use that character as discard fodder for the combo, if necessary; it’s awkward that the discard has to be a character, but the search means that it’s not as bad as it could be.)
I mentioned the stockshuffle earlier, but of course it’s important to have a decompression option when your finisher is a bunch of burn 4s.

It’s a bit sad that you have to ditch a character in order to stockshuffle, on account of the card also being a front-row global 1k + hand encore (which you’re not likely to take advantage of, though I suppose it could potentially come up if you’re really far behind or something). But since the finisher doesn’t need much hand, it’s not a big deal.
This is a 2-of since you want to have access to it, but it’s not useful until level 3.
Also mentioned earlier was the shuffleback-4 card.
I already talked a lot about how useful or not this card is on the finishing turn, so I won’t go back over that here.
Note that it can only shuffle back characters, not events or climaxes; that’s not likely to come up, but it’s a difference from other types of shufflebacks. Also, summoning the level 0 Kafka is mandatory, if there’s a target available; this deck runs 1 single valid target, the climax searcher. (I say “Kafka”, but really it has to have his full name, “Kafka Hibino”.)
I’m running this as a 3-of because it might be a reasonable thing to play at level 2 if the opponent is compressed (and so shuffling back 4 characters might be more impactful than a 3rd attack) and you’re not worried about leaving a character alive (possibly because you couldn’t kill it anyway). This also generates up to 2 more stock than just playing down a costless character and swinging with it. It’s all blind stock, though, so it’s most useful when you’re uncompressed. It does also need a Kikoru on stage, and this deck doesn’t run any of those at level 0 or 1, so you need to play the early play alongside it for it to work.
On that note, here’s the early play.

It’s a pretty basic 4 or more EP stock healer. It swings at 11k with optional memory kick, so it’s a pretty good attacker that can randomly deny on-death effects and whatnot. It heals from the bottom of the clock rather than the top; that mostly doesn’t make much difference, but it could be a bit worse if you just took a climax as refresh penalty, for example.
This is a 3-of since it’s always nice to have the option to heal down at level 2; playing two in a turn isn’t too likely because of the EP condition, but it’s still an option if it comes down to it. As the only healer in the deck, this can also be important if you end up at 3-6 close to refresh, or at 3-6 and needing to use the salvage riki.
If you’re not looking to heal and/or shuffle back cards into the opponent’s deck at level 2, though, you’d still like some decent attackers. Probably the best one is this Soshiro:

This is a somewhat common profile nowadays: a 2/1 with draw 2/drop 2, stock refund, and a 10k statline. It does need a full field on play for the stock refund, which means that you can’t play it on the same turn as the EP (or another copy of itself) without playing over something. But apart from that, it’s very nice: it provides some filtering (one of the only utility effects this set has on a level 2 or higher character) as well as a ditch outlet for climaxes or events, and it’s an effectively costless 10k attacker; since it refunds the stock from the waiting room, you can also use it to take a non-soul-trigger out of rotation.
It’s only 10k if you have a full field, meaning that you tend to want to attack with it first just in case the opponent has a memory kick backup or something. This also means that it loses power on the opponent’s turn if you crash any lanes (unless you crash the 3.5k Reno and it hits the top check and rests itself) or bounce back the red level 0 Mina, but that’s not much of a problem; in fact, it might even be a benefit, because you’d generally prefer your finisher not to be swinging into open lanes, unless you actually want to swing for 5.
This is a 3-of because you likely want to play at least one of them a game, at level 2.
Since both the EP and the 2/1 Soshiro want you to have a full field, you need something to put in the back row besides the brainstorm. Kaiju No. 9 fills that role quite well:

This card lets you save a stock on your finishing turn by spending one up front, which is quite nice; however, it does carry some risk. It forces you to play a level 3 as your first action in the main phase if you want to save that stock, which could be awkward if you’re close to refresh and your deck doesn’t have much selection, for example. And it only works at all if you’re level 3 at the beginning of your main phase, so it makes clocking up to level 3 during your main phase even more expensive. So the more likely you think it is that your opponent will try to trap you at level 2, the less valuable this card becomes. Of course, if you’re still level 2 (whether because your opponent was specifically aiming for that, or just by chance), you also have the option of healing down, in which case you might still have the opportunity to use this card on the next turn.
I honestly forgot that this card also has a powerpump ability; that’s pretty minor, but it could still be helpful for taking out the opponent’s characters.
This is a 3-of because, once again, you generally want to play one at level 2 (or at least have the option to).
This changer can serve as an attacker that can help you get a full field for the EP or Soshiro:

While you could use it to change into the TD finisher combo and get a clock kick at level 2, its primary use here is just to serve as an effectively costless 7.5k attacker, so long as you don’t need to brainstorm. Since the stockgen ability stocks from the waiting room, it’s another way to take a non-soul-trigger out of rotation. You do need to get a reverse, but the Soshiro has a decent chance of enabling that, and this card itself can likely at least take out a level 1 (and you can potentially pump it with the red level 0 Mina). The EP is also an option to assign the ability to, if you don’t expect your opponent to have an antichange backup.
This is a 2-of, since the conflict with the brainstorm means you don’t always want to play it, and it’s not the most impactful even when you do, but it’s still nice to see at level 2.
I am in fact also running the change target:

Though this isn’t so much meant to be brought out by the changer as to just be a 3rd finisher lane if you can’t afford triple combo, particularly if the amount of damage you need to do is 1 or 2 more than a multiple of 4 (depending on whether or not you expect the opponent to refresh).
This is just a 1-of because it’s a fairly niche use-case (particularly since the stockshuffle is often a better option alongside double combo).
And finally, there’s this grappling hook:

This fills a few different roles. Arguably the more important one isn’t the grappling hook effect at all, but rather the fact that it sends itself to the bottom of the deck. Since the finisher needs to have the event available in the waiting room when it attacks, you can’t afford to refresh before that happens, and this card can increase your decksize by 1 to help avoid that. It’s also a guaranteed soul trigger in deck, if the last combo mills you to refresh.
The grappling hook effect could be useful if the opponent crashes to try to make your finisher overswing (or just naturally crashes into a level 2 or EP), to let you modulate your attack damage (possibly even giving you a side option, if the opponent happens to have a level 1 or 2 in back, or a level 3 if you feel confident in triggering a soul trigger). There’s also a slight possibility to pull up a card you want to remove (like an anti-burn) and then clock- or memory-kick it.
This is a 1-of, as a tech card that’s primarily meant for use at level 3.
Cards Not Included
All the 1/0s with soul triggers:


These could be nice in a version of the deck with the choice level 1 combo, that’s just looking to maximize the number of soul triggers without going for double soul triggers, but since this deck is also aiming to have a high count of level 2 or higher cards, just having a soul trigger isn’t enough to make me include level 1s.
Level 2 on-reverse search if you have a climax:

I initially thought this would be a good attacker at level 2, but I ended up finding that it wasn’t really necessary, and I often preferred to ditch climaxes rather than playing them. Also, I tended to want green at level 2 to play Kaiju No. 9, which conflicts with needing red (since yellow was already needed for the event at level 1). It also just doesn’t swing that big, particularly with most of the climaxes in this deck not giving power.
Red early play healer:

I initially had a split between this and the yellow EP, but cut this when I cut the red level 2 above, since that meant the deck no longer needed red at all. There’s potentially an argument for adding this back in as a 1-of, though, as a healer that can also slightly help with the finish, or just to give you the choice between a stock healer and a standard healer.
Though there are also some other, on-color cards that can fill those roles, if you’re just concerned with level 3.


Level 3 with a removal ability:

This set’s bouncer is a level 0, so the only removal card with a soul trigger is this one. It could be nice to have it as an option, but it has a chance of whiffing and the opponent can just 3-stock whatever you remove anyway; depending on the situation, making them spend that stock might be enough, but it just as easily might not be. With the high count of soul triggers you’re already going for, it’s also distinctly possible to side level 3s with the finisher if you’re worried about tap counter or mill counter or something.
Backup with a salvage ability:

This is one of the few cards with a soul trigger that provides some sort of selection, but you don’t have much that you’d want to back up, so it likely ends up being quite expensive (if you can use it at all).
Level 2 Kikoru:

If you want a Kikoru name on board for the shuffleback, this is another option besides the EP; it can also summon the grappling hook, giving you two level 2s for 1 stock. But I’d prefer to get level 2s for 0 stock rather than 1, and enabling the shuffleback at level 2 without the EP doesn’t feel particularly important to me.
Level 2 that can manipulate top deck:

This card could help your finishing turn by checking the top 2 cards and removing a non-soul-trigger if it sees one; however, it costs a hand and a stock to play it on the finishing turn to begin with, and potentially another hand if you want to leave both cards on top. There are likely better things you can do with those resources (and there’s the other level 2 Soshiro if you want to dig for a climax or something).
(I focused on level 2 or higher cards with soul triggers in this section, since that’s where the deck has the most flexibility.)
Closing Thoughts
This deck tends to struggle to kill the opponent’s characters, which is particularly worrying if they can capitalize on that to get compressed. And I feel like the current Japanese meta is fairly compression-focused in general, which doesn’t put this deck in a great position. But it still has a decent chance of killing from high level 2 into a compressed deck, so I think it’s still quite reasonable — honestly, more than I expected, what with it not having a plussing combo. And of course, against an opponent who isn’t compressed, it can be extremely scary. It does have to actually hit level 3, though, and while it’s got some tools for clocking up or healing down, they’re mostly pretty standard. The climax search is probably the most notable, as a costless way to clock yourself that can also get you your finisher climax.
So overall, I feel quite happy with this deck. The parts I was worried about generally don’t seem to be too bad: the early game feels decent despite not having a plussing combo; getting events into the waiting room for the finisher isn’t much of a problem, even if it can be awkward at times; finding the 2-of finisher climax isn’t too hard; the deck can deal with compression well enough to not be a deal-breaker; and setting up a deck full of soul triggers seems to be fairly consistent. And the finisher can be extremely powerful, while also being fairly cheap and easy to set up.
Is this version of the deck better than a version with the choice level 1 combo? I suspect this one does get slightly more burn 4s, though it’s possible that the choice combo would get you the resources and/or selection to do triple + stockshuffle in cases where this deck has to choose between them, or something like that. That version of the deck might also be swinging into a less compressed deck on account of not leaving as many of the opponent’s characters alive early on. But perhaps the biggest benefit would just be that that version of the deck is more likely to play climaxes regularly, letting it take advantage of the high soul-trigger count to not just keep up in damage but actively rush the opponent. Though on the flip side, it may also be less inclined to play down a climax at level 0, because it has to save it for level 1. (And for that matter, it might attack fewer times at level 0, since it needs to make sure it can fulfill the combo’s full-board condition at level 1.) I haven’t tried making that version of the deck, so I don’t know how it’d end up exactly; it may well be that that version is overall better, but either way, I can at least say that this version works.

Leave a comment