After making a deck with the RR Tomori finisher last time, the next deck I’m looking to build with the new MyGO × Ave Mujica set is one with the RR Doloris finisher:


(Once again, you can find translations for cards from the new set on Weiss Tea Time; I guess they’ve moved to the archive by this point. I’ve also once again linked a couple promos that don’t exist in English to cards from different sets with the same text.)
Table of Contents
Finisher
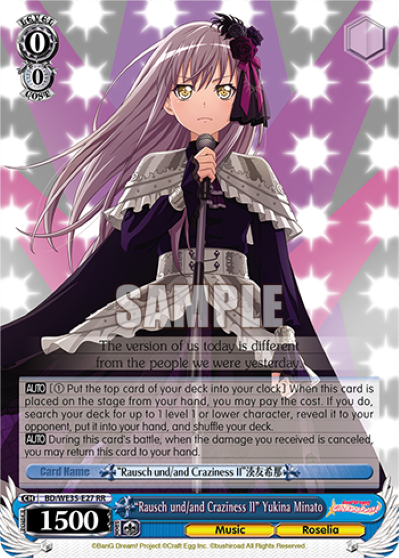
Since this combo can be pretty confusing if you haven’t seen it before, I’ll quickly go through how it works. Doloris’s combo gives her the ability “once per turn, when this card’s damage is cancelled, deal the same amount of damage to your opponent, and choose one of your other characters, and it gets this ability until end of turn”. “This ability” means everything in quotes there, so it includes both the cancel burn and passing the ability on.
This means that if you just have a single combo and attack with it first, you can get 3 cancel burns if all 3 attacks are cancelled, by passing the ability on to the next character you’re going to attack with each time.
And if you have triple combo, you can get up to 6 cancel burns: you combo with the first Doloris, her attack cancels, you burn and pass the ability on to the second one; you combo with the second Doloris (meaning she now has two instances of the ability, one passed on from the first Doloris and one from her own combo), her attack cancels, you burn twice and pass the abilities on to the third one; and then you combo with the third Doloris, her attack cancels, and you burn three times (with the three copies of the ability, one from each combo).
Of course, if at any point the attack doesn’t cancel, you neither burn nor pass the ability on. In particular, if you have triple combo and the second attack goes through while the others cancel, you then only get 2 cancel burns in total, one from the first combo and one from the third.
There are a few cards that make this finisher significantly better by letting the abilities get passed around more.
First off, there are a couple restanders. By passing the ability first to the restander, then to the second combo, then to the restander again, you can still get up to 6 cancel burns, on top of getting 4 attacks. Also note that if the restander’s first attack goes through while it has the cancel burn ability, that ability will stick around and can still get you a cancel burn if the second attack cancels. One of the restanders requires a reverse but is cheaper; the other restands at the end of its attack (and heals, and doesn’t have to have been played that turn) and is more expensive. (Only the on-reverse one exists in English.)

One downside of a restander is that they swing at 3 soul with the climax, rather than 4; you’d ideally like the attacks themselves to cancel — at least the middle ones — to be able to pass on the cancel burns, so swinging bigger should generally be better (though since the cancel burns are for the same amount as what was cancelled, you don’t want them to get too big, to give the cancel burns a chance to go through). My thought is that you could use the O-Tae bounceback to pump a soul to the restander (or a combo), since that doesn’t actually cost any hand to play, given that you’re playing a climax; the top check 2 rearrange could also be helpful.

Then there’s an Oblivionis that can burn at encore step and works from the back row, giving you something for the last attacker to pass its copies of the cancel burn ability to; that lets you get up to 9 cancel burns when combined with triple combo.

I’ve used the probability calculator to get an idea of how effective this finisher is in a few different configurations, shown below.
Notes: These aren’t perfect, since I’m not keeping track of the characters’ soul, but should be pretty close. For compressed deckstates (like 8 in 20), it’s fairly likely that a decent chunk of damage will happen after refresh; in all of these, I set it to exclude 15 cards (a fairly arbitrary number) from rotation.
When discussing the costs, I included the stock for the 2/1 Uikas, and put a range for the hand to account for the fact that you could either play them on the finishing turn or play them the previous turn and time machine them (if you can get the reverses). I suppose the higher hand count is more accurate if you’d be looping a combo or something regardless; in that case the benefit of the time machine is more of not relying on a climax and being able to get around the hand limit.
These stock costs allow for the combos to attack first, or between a restander’s attacks; you can sometimes save a stock by attacking in a different order, but that potentially makes the finisher weaker.
All of these assume all Dolorises have 4 soul.
- Double Doloris
Cost: 3 stock, 5-7 hand, third attacker

- Triple Doloris
Cost: 4 stock, 7-10 hand

- Double Doloris + Oblivionis Backrow (in front, attacking second if the first attack cancels)
Cost: 5 stock, 6-8 hand

- Double Doloris + Oblivionis Backrow (in front, attacking last)
Cost: 5 stock, 6-8 hand

- Double Doloris + 3-Soul Restander
Cost (reverse): 7 stock, 7-9 hand
Cost (end of attack): 9 stock, 8-10 hand

- Double Doloris + 4-Soul Restander
Cost (reverse): 7 stock, 7-9 hand
Cost (end of attack): 9 stock, 8-10 hand
(Requires the bounceback or some other way of pumping soul)

- Triple Doloris + Oblivionis Backrow
Cost: 7 stock, 8-11 hand

- Double Doloris + 4-Soul Restander + Oblivionis Backrow
Cost (reverse): 9 stock, 8-10 hand
Cost (end of attack): 11 stock, 9-11 hand

- Triple Doloris + Double Oblivionis Backrow
Cost: 11 stock, 9-12 hand

My first takeaway is that it’s almost certainly not worth going for the end-of-attack restander: the Oblivionis backrow (and 3rd combo) is better for basically the same cost. The on-reverse restander might be worth it over the second backrow, but likely still not worth the slot, since there’s a fairly narrow window of resources where it’s the best option. If you only have double combo, you can still just attack with the Oblivionis, which isn’t much worse than attacking with a restander. In that case, it seems to be better to attack with the combos first rather than going for Doloris-Oblivionis-Doloris-burn 2, unless the opponent is quite compressed. I suppose that makes sense: attacking with the combos first prioritizes the bigger swings to get cancel burns, effectively; you maybe can’t pass them on to the burn 2, but that’s less likely to cancel anyway.
Power Pumps
Since you ideally want to time-machine the level 2 Uikas for a turn or two before your finishing turn, and they only swing at 8.5k naturally, some sort of power pump is probably pretty important. To start with, I’m thinking I’ll run the Rimi brainstorm, for that extra 500 power, but that alone isn’t much.

My first thought when it comes to power pumps is the Rimi bounceback, being a repeatable way to pump multiple lanes (or just stack 3k in one lane) without costing any stock or hand (unless you run into the hand limit, but that’s not too likely on a time machine turn).


Competing for that backrow slot are assists and the like, I suppose: in particular, there’s an Amoris that’s an on-turn global 2k and can also sac a character to draw, making utility cards more efficient to play (potentially just additional power pumps) and letting you get around the hand limit in a way that Rimi doesn’t; and there’s the Saya level assist that can prevent events or backups in a lane, which can also be nice on the finishing turn (though just one lane may or may not be impactful), though it does compete for rests with the brainstorm.


There are also some on-attack power pumps, which of course don’t work if you want to triple time machine, but it’s quite possible that you don’t have three of the 2/1s or three reverse targets anyway.
First off, there are some very simple level 0 2.5k pumps; these can also be nice at level 0, and while they only swing at 500 base power, if you need to pump your level 2s in the first place, that likely means the power pump is swinging in a lane that you’re not contesting regardless. The red one exists in English but the blue one doesn’t. In the same vein, there’s also a level 2 that pumps 5k, if you feel like 2.5k isn’t enough.


I’m expecting to run some events in this deck, so the adachi that pumps based on the number of events in waiting room could potentially be a sizeable pump; being an adachi, it can also take out some things that the level 2s can’t.


If you want to pump both other lanes rather than just one, there’s also a level 1 that pumps 2 characters 1.5k; that’s overall more than 2.5k, though if you also have another power pump (e.g. the Rimi bounceback), the 2.5k is more flexible, since you can then choose to either put all the pumps on one lane or split them.

There are also some power pumps that don’t take up a board slot (or at least don’t need to). While it might not entirely make sense to play a character for a power pump and then play over it when your goal is to save hand with the time machine, they could be useful alongside the Amoris backrow, or if you just find yourself over hand limit (though in the latter case it might be better to look to convert that extra hand into stock instead).
I believe the biggest unconditional pump is for 500 × the number of your Music characters (so 2.5k the majority of the time). It’s also a decent attacker at level 0.

If the opponent has level 3s on board, you can effectively get a 4.5k pump in 2 lanes, though as a 2/1, it does cost a stock.

There are also a couple cards that can sac themselves to pump 2k, an on-death koume and a draw brainstorm; also getting to use those other abilities might make it more worth it to spend a hand on the pump.


Then there are a few alarms that can pump 2k; those don’t require you to play them to board, but they do compete with other alarms (in particular, the one that generates stock). One of them also pumps a soul, which could be nice on the finishing turn as well (but the finishing turn can also take advantage of the stockgen alarm).


Of course, when you’re looking to not take up a board slot, events are perhaps the best option; there are a few of those that pump power while also converting to a different card in hand or a stock. My inclination is to go with the one that pumps based on the number of climaxes in waiting room, though there’s a decent chance that you’ve just refreshed and thus one of the others might be better. A split between them might be best, though for that to be worth it you probably need to have enough of them that you’re fairly likely to find multiples (and then be able to hold onto them).


Level 1 Combo
For the level 1 combo, I figure the primary thing you want to do is sculpt into the level 2 Uikas, which then form the core of your level 2 game. I’m also thinking that it should be an alternative option when you’re not able to get reverses with the Uikas, which pretty much eliminates on-reverse combos, even ones that assign the reverse. Some possibilities:
- Taki: A guaranteed salvage that cleans out triggers, but needs to resonate. The resonate target also being an off finisher means it’s not that bad, but it’s still a notable deckspace requirement (particularly since you’ll then also want to run the bonder to the resonate target), and it doesn’t get you a huge benefit in return. Cleaning out triggers doesn’t necessarily matter too much when you’re likely paying some stock out with 2/1s next turn anyway; and you can potentially stash a level 3 Doloris in stock, but the fact that it goes to the bottom makes that more awkward.


- Oblivionis: I’ve seen other people play this with the Doloris finisher. It has good deck control and the potential to get a mix of hand and stock, but it’s not especially selective, and being loopable isn’t super helpful when your main gameplan is to transition into the 2/1.


- Christmas Kasumi: I’m almost certainly running the warehouse event anyway, since you’re fairly likely to hit at least 2 characters to be able to grab the level 2 Uikas; still, needing the events in waiting room is a real condition, and then you have to have the Uikas in waiting room next turn (likely after having refreshed) to be able to salvage them. The main benefit of this is probably the potential to easily use an event swapper to access the stockswap event.


- Kokoro: Has the potential to generate a lot of hand, but not reliably. This might be more tempting if I was planning to run the restander and a way to pump soul to it, but as it is, it just seems too easy for it to whiff without dealing that much damage.
- Moca: While this does need a reverse to salvage, it can also just get stock instead. I’m already looking to run power pumps to help get reverses with the 2/1, so this could potentially take advantage of those as well.

- Mashiro: This lets you play the related event (well, lets you salvage higher level characters off it), and has a bit of mill. It’s not guaranteed to be able to grab level 2s, but it has a decent chance of it, I think. It doesn’t swing particularly big, but power pumps can help with that.


- Tomoe: Being on a stocksoul and being able to salvage the alarm that gets you free stock means that this can effectively be a +2 stock combo that doesn’t compete for board space with the 2/1s (except insofar as it takes up a backrow slot that could be a power pump, I suppose). On the other hand, the amagi ability isn’t very useful when it whiffs on most of your deck, and if you already have an alarm in hand or something, your other options to grab off the combo are fairly limited. You also have to include cards to actually attack with at level 1 (ideally ones that can help you maintain hand, since the combo is just getting you stock).

Initial Draft
I’m thinking I’ll just go with the Mashiro cigarettes combo, as a simple combo with some built-in deckspeed. So putting some numbers on this deck, I definitely want 4 of each of the combos and the level 2 Uika, and probably 2 of the Oblivionis encore step burn (to keep the option of double of that open, even if you’re mostly going for single).
For events, I’ll start with 3 each of the warehouse event and the event that goes with the level 1 combo, and 2 each of the 2/0 events that give power and an on-reverse ability.
Probably 2 of the stockswap event as well; this finisher does do better against uncompressed decks than compressed ones. (It also largely removes the downside of stockswapping when the opponent has significantly more deck than stock — meaning they’re left with a smaller deck with the same compression — since it welcomes a few cancels to get it started, and can then take advantage of the decompressed post-refresh deck.)


That’s 12 events, so I’ll throw in one of the adachi that pumps based on the number of events in the waiting room.
That’s already 27 cards, none of which are level 0s; might need to trim some of them down. Honestly, I might just not bother with the stockswap; while it is beneficial, it’s not necessary in the same way it can be in other decks. I’ll also cut one of the 2/0 events, probably the search one; there’s just a fairly small window where these 2/0 events are useful, so 4 of them is maybe overkill. I’m not sure if 8 events is enough to justify the adachi still, but I’ll keep it for now, potentially swapping it out for something else later… though actually, thinking about what I might want to replace it with, I’m realizing I probably want to include the triple bouncer, to deal with defensive counters (or at least force them onto the first attack, which is the least impactful since it doesn’t break up the chain). Though that only works if you’re building the deck in Japanese, since that card doesn’t exist in English. I also think I want to include something to help get the climax for the finishing turn, probably the level 1 Uika koume (since that can be useful earlier as well), though another option is the level 3 Anon (which is more reliable and can also be an off finisher, but is harder to grab off the level 1 events). So that brings it down to 24 cards, leaving 18 slots available for level 0s.


For level 0s, to start with I’m thinking 3 of the Rimi brainstorm and 2 of the Rimi bounceback. There are a lot of ways to get the brainstorm, so that could potentially go down to 2, but it’s nice to have access to it early and not need to spend sculpting on it.
The climax swap will probably be the Taki; at level 3 you can probably sac the brainstorm, and at level 1 you can potentially sac a riki or something (and notably, you can riki for the climax swap even with just 1 stock).

Speaking of rikis, I tend to default to the on-death search riki and the on-death check 4 riki (since there are a decent number of level 1 events); let’s say 3 of each. It might be nice to have an on-play riki as well, but I’d generally prefer to need to play over in order to level up during main phase, rather than having to wait until turn 2 to play my rikis.


I also want at least one of the Kanon that goes to stock, as a way to convert extra hand into stock; I’m not sure how much this deck will need to worry about that, so probably just one to start with. And then I want a helmet or two, as a way to indirectly get higher level cards off the combo or events, if necessary; it’s also a ditch outlet for climaxes. And I’m thinking a couple of the 500-times-board power pump would be good.


So that’s 17 level 0s, leaving me with one more slot; for now, I’ll throw in the Yuri that can keep an opponent’s climax out of refresh, as a minor decompression tool and a minor source of selection (mostly for the encore step burn, I guess… oh actually, the helmet is green too).

For the deck name, at one point I was thinking about how the finisher isn’t especially perturbed by facing down a compressed deck, from which came the name “Compressionis: 我、キャンセルを恐れるなかれ”. (“I do not fear cancels”; I guess “cancels” and “compression” aren’t exactly the same, but “Cancelis” or whatever doesn’t sound nearly as good as “Compressionis”.) Technically, the finisher does do notably worse against compression, so the name isn’t entirely accurate, but it’s at least not afraid of a small compressed deck (with a less compressed waiting room).
And now I realize I forgot to put in the EP healer; I guess I’ll make a version that replaces the triple bouncer with that, and call it the English version. (Maybe later I’ll try to work them both in or something.)

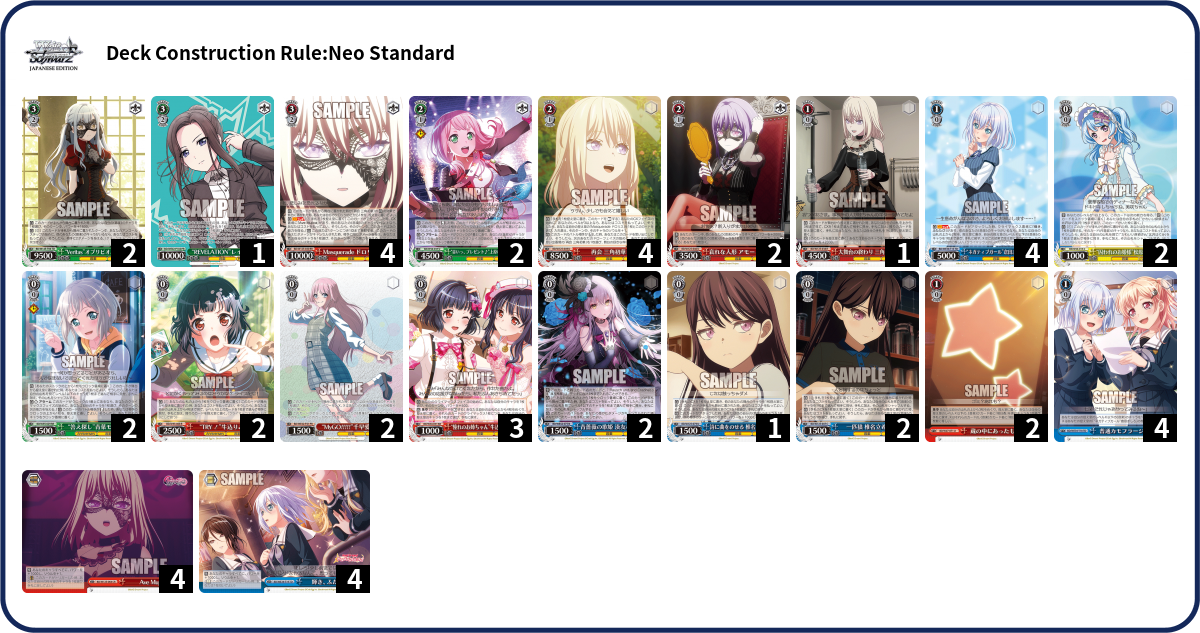
JP Version:
Deck Log: 4MS42
EncoreDecks: htWtzBGSf
EN Version:
Deck Log: 4QX4E
EncoreDecks: sWWm32zrr
Changes and Fine-Tuning
(In my previous post, I made decklists for each version as I made changes; this time I think I’ll just do that for the first version and the final version, since it’s a bunch of small changes.)
After a couple test games, I’ve realized that the problem with the Rimi bounceback is that it only pumps power if you play a climax, and the idea is that you don’t need to play a climax at level 2. So I think I’ll swap to the Amoris level 2, though that does take the number of level 0s in the deck down to 16.
One nice thing about the level 2 Amoris is that if you end up with a riki sitting in back on your level 1 turn, you can turn that into a draw once you hit level 2. Alternatively, you can have double brainstorm sitting in back at level 1 before replacing one with the Amoris. (Or just play down some random character that you don’t need and sac it, to effectively use it as a ditch-draw.)
Hmm, with the Amoris, you then want more stock at level 2; I’m thinking I’ll switch the level 2 events to the one that goes to stock, and try to fit in another Kanon (replacing the Yuri I guess, since I didn’t feel strongly about including that to begin with).
It would also be nice to have the level 0 Amoris that changes into the level 2, to make it trivially accessible off the combo & events, but I don’t particularly want to cut the level 2 itself down to 1 (I feel like it’d be fairly likely to not be in waiting room at that point), so I might not bother with that.

I also feel like I need a bit more blue; right now it’s just the level 1 combo, events, and climax swap, none of which I particularly want to clock or level at level 1. Probably the easiest way to get more blue is to put in the Yukina riki; I don’t really want to cut either of the other rikis, so I guess I’ll just go for a 2-2-2 split.

I feel like I don’t really get the 2/0 events to hand, or hold onto them; going to try swapping them out for the stockgen alarm, since that can potentially be grabbed off the combo or a door trigger, at least. (And then change the level 1 event split to 4 blue & 2 red to try to keep some amount of blue; that feels a bit bad though, since the extra mill can be nice at level 1. On the other hand, it could be better when you’re 1-0 or otherwise don’t have red.)
I’d kind of like a way to ditch climaxes that doesn’t cost hand like the helmet does (leaving a body on board can be nice just as an attacker, or as something to sac for the level 2 Amoris). I think I’ll swap out the helmet for the Taki drop search that can ditch a climax to salvage a character; that also has the benefit of being able to search out the finisher if you refreshed at level 3 (or in general, of providing some on-demand deck access). I might have gone for a split between these two utility cards, but the Taki is also blue, which means there’s a decent chance one of them will end up in level (and I’d just generally like that extra blue card).

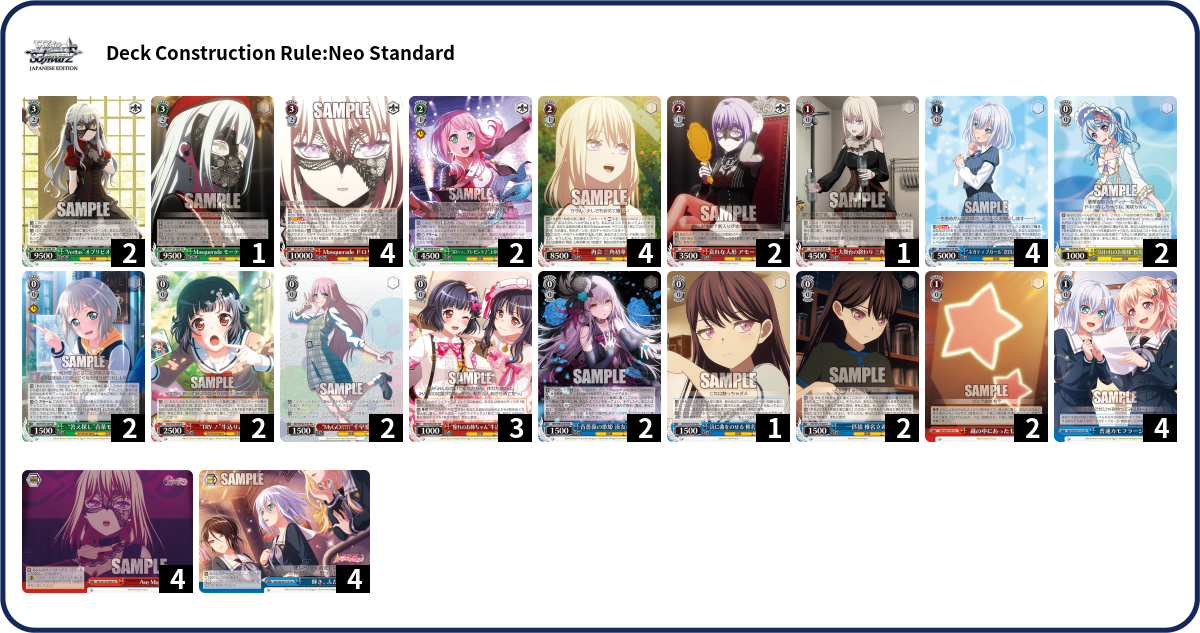
So here’s where I’ve ended up:
JP Version:
Deck Log: 5PRPC
EncoreDecks: GPiueg-zw
EN Version:
Deck Log: 5HFNN
EncoreDecks: qMlZw_mc7
Closing Thoughts
In testing, I’ve generally got at least double Doloris + Oblivionis, and triple Doloris + Oblivionis if the game goes reasonably well; and I’ve always changed into the combo from the 2/1 rather than hard playing it (which does mean that I often feel like I’m struggling for hand a bit on the finishing turn; perhaps it would be nice to have more ways to convert stock to hand). One downside of the deck is that it’s particularly vulnerable to triggering climaxes or otherwise ending up in a bad deck state at level 2, because the time machine leaves empty lanes. And it can be awkward if you refresh before hitting level 3 and don’t have the finishers in the waiting room, or hit level 3 too close to refresh and need to avoid clocking (or brainstorming, or drawing with the level 2 Amoris) in order to keep your waiting room.
I’m not sure whether this deck or the Tomori finisher one is better. They can both present passable finishing turns in bad games while having the potential for very powerful finishing turns in good games. Doloris is more vulnerable to defensive counters, but Tomori is more vulnerable to midgame decompression. Tomori is cheaper, but some amount of the time the resources saved go towards a fumio that wouldn’t be necessary for Doloris. Doloris has a better chance of surviving the swingback if you fail to kill (on account of healing and being more likely to leave a reasonably compressed deck), but Tomori is potentially better at sandbagging a turn at level 3 (with the heal 2 option). Tomori can feel awkward on the finishing turn because you tend not to want to mill your deck too much (e.g. by brainstorming), but the same can be true of Doloris if you’re too close to refresh and the finishers are in your waiting room. Tomori doesn’t rely as much on having the finishing climax, but Doloris doesn’t rely as much on having climaxes in the midgame (though it does rely to some extent on being able to get reverses). Obviously not all of these are equally impactful or important, but on the whole, I’d say the two decks feel pretty comparable.

Leave a comment